Showing posts with label minced meat. Show all posts

Monday, 3 April 2017

Meat Pie from Scotland - Bridie

Time is always rushing by so fast and ... well ... often I don't know where it went. There is not much you can do about it, but it's better, if you don't feel like your life is just passing by and you are just in a routine and are not trying out new things. Well, this time you might try something from Scotland … Bridie …

Already before I thought about trying it and so I had to do some research and here we go with my results.
Ingredients:
300 g flour
75 g butter
75 g lard
Salt and pepper
A bit of water
500 g minced mead
1 onion, finely chopped
2 cloves of garlic, finely chopped
Method:
First of all we start with the pastry. The flour goes into a bowl with a pinch of salt. Oops, I added pepper here, too. Ah, no worries. Then add the butter and lard. Rub it into the flour. Then add just enough water to bring the pastry together into a nice lump of dough.
Wrap the dough into cling film and put it into the fridge for one hour.
Divide the dough into four portions and roll each one out into a kind of rectangular shape.
Mix the minced meat with the chopped onion and garlic and generously season with pepper and a bit of salt. Accordingly divide the meat mixture between the four dough pieces.

Wet the edges of the pastry with water and fold over the loose end and carefully seal it. Move the two ends of the closed pastry together so that the crimped edge is on the outside. Hm, does this make sense? Have a look …

Make incisions on top of the bridies. Transfer the unbaked bridies to the fridge for half an hour. When it’s almost time, pre-heat the oven to 200 °C. Bake the bridies for 30 to 40 minutes until they have a lovely colour. Luckily, I noticed the auto-correction or otherwise we would have had baked brides. For sure something, we don’t like to have.
Ready for eating. Either eat them just like they are as a snack or with potatoes and vegetables on the side.

Some kind of gravy would be nice for they can be a bit dry. Well, at least I had a glass of cider on the side and a glass of whisky afterwards …
Bridie
So, die Zeit ist abgelaufen. Erst mal komme ich wohl nicht nach Schottland. Aber wenigstens kann ich ein wenig traditionelles schottisches Essen ausprobieren. Hm, Haggis erst mal nicht. Eher diese gefüllten Teigtaschen, die man Bridie nennt. Für solche Sachen bin ich ja immer zu haben.
Zutaten:
300 g Mehl
75 g Butter
75 g Schweineschmalz
Salz und Pfeffer
Etwas Wasser
500g Hackfleisch
1 Zwiebel, feingehackt
2 Knoblauchzehen, feingehackt
Zubereitung:
Erst mal zum Teig. Das Mehl in eine Schüssel geben. Dazu kommt eine Prise Salz … oops irgendwie hab ich auch eine Prise Pfeffer dazugegeben. Was soll’s. Nun noch die Butter und den Schweineschmalz dazu. Das dann sorgfältig ins Mehl massieren. Zum Schluss noch Wasser dazu, so dass wir einen schönen Teigklumpen erhalten. Dieser wandert dann für eine Stunde in den Kühlschrank – eingewickelt in Frischhaltefolie.
Währenddessen könnte man schon mal die Füllung vorbereiten. Keine grosse Sache. Einfach das Fleisch mit der Zwiebel und dem Knoblauch vermengen, salzen und pfeffern und fertig isset.
So, Teig zur Hand, in vier Teile aufteilen und ausrollen, in so ne Art Rechtecke. Die Fleischmasse auf die vier Teigteile verteilen (siehe Foto oben). Die Ränder des Teiges mit Wasser anfeuchten und zusammenklappen, kleben. Wie oben auf dem Foto gezeigt, die Spitzen der Teigtaschen nach innen zusammenschieben und oben am Teig zwei Einschnitte machen. Das ganze geht dann nochmal für eine halbe Stunde in den Kühlschrank bevor die Bridies bei 200 °C 30-40 Minuten gebacken werden.
Das fertige Produkt so als Snack essen oder mit Kartoffeln und Gemüse zusammen, vielleicht noch ne Sauce dazu oder vielleicht auch nen Spritzer Ketchup.
Die Bridies schmecken auch kalt am nächsten Tag oder auch wieder kurz aufgewärmt.

Saturday, 15 March 2014

Chain Reaction: Italian Week - Tomato Sauce, Pizza and Lasagne

Sometimes one thing leads to another. I like to have some kind of cooking chain reaction, when the leftovers of a meal come to star in another meal or two or even more. I dreamt of five meals or so. Well, I will be satisfied with less ... for now.
It all started with a tomato sauce. No, not exactly, it started when I found some lovely celery sticks and carrots smiling at me. When celery and carrots smile at a man, the only thing you can do is smile back and ... cook with them.

Meal 1: Pasta with Tomato Sauce (call it vegetarian bolognese, if you like)

Before I go on, I just want to tell you, I couldn't find the photos of the pasta with tomato sauce. Maybe that's because I didn't take any.

I put a large pan with olive oil on medium heat. Then I went about finely chopping two cloves of garlic, an onion, four celery sticks and two large carrots. All the tiny bits of vegetable ... eh, maybe I didn't chop them that fine ... went into the pan in order to be soften. Have patience and enjoy the process.
Next I poured a tin of tomatoes (400 ml) into the pan with some extra water. I better should ave taken two tins or a larger one. That's why I added some fresh tomatoes and a bit of tomato puree later on. Oh, some chopped up red chillies will give the sauce some extra heat, too.
It's important not to forget the seasoning. Good I didn't forget it the same way I forgot the photos and (you will see later) something else.
Anyway, now you want to get the content of the pan boiling and then leave it simmering for 30 minutes.
At this point you check the seasoning again. Better safe than sorry.
Now a splash of red wine vinegar comes in handy and ... you have to make a decision. You could just break up the tomatoes with a spoon or put the whole sauce into a blender and ... let things go. I went with blender. I wasn't in the mood for coarse consistency this time.
Finally I added some chopped up fresh basil.
Cook your pasta according to the package instructions, if you are not doing fresh pasta.
Again, if you don't forget, you could catch up some of the cooking water to add to the sauce.
Whatever the case, have a plate of pasta with the tomato sauce and some parmesan on top. It won't disappoint you.

Of course we have some leftover tomato sauce in order to continue ...

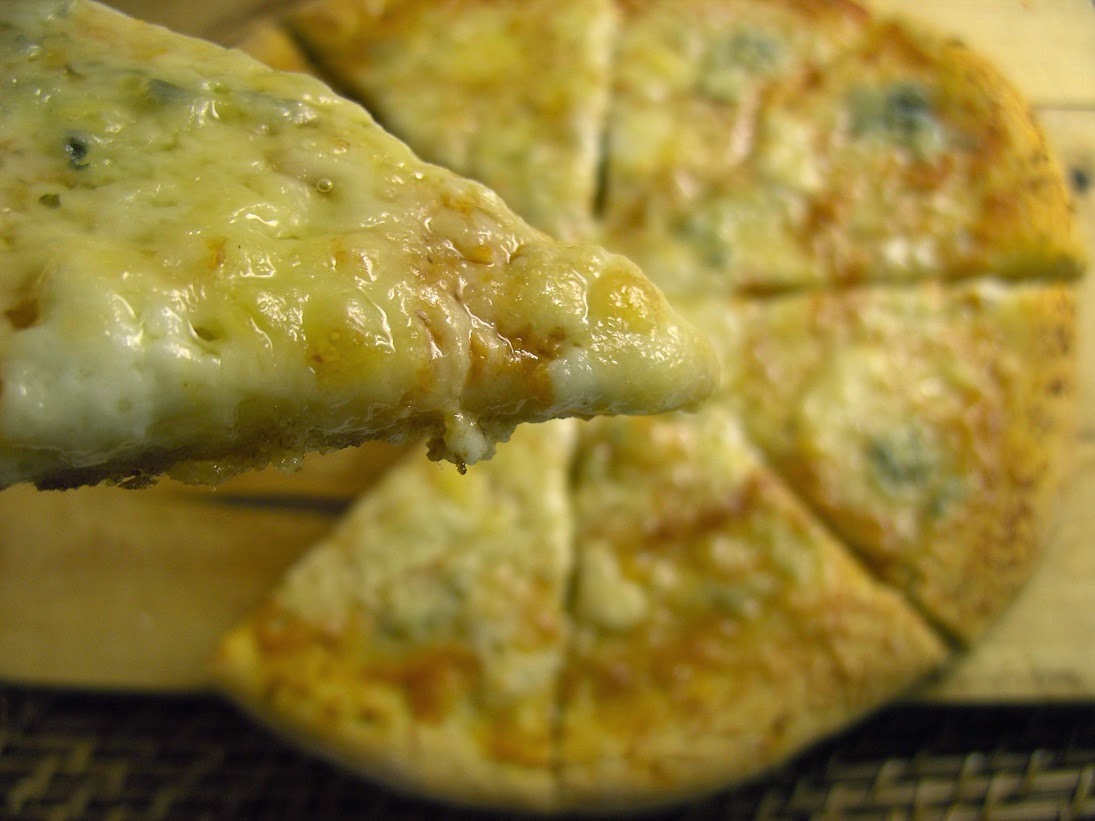
Meal 2: Four-cheese Pizza

I had to do this. It was about time I do a post with pizza again. You can never have too much.
I want some tomato sauce for my pizza before I put the final topping on, no matter what it is. At least that is what I think right now. Well, I can't remember it otherwise right now, I forgot it (with all this forgetting, I reckon I am getting old).


Fine, we already have our tomato sauce for the pizza. What else? Of course, the pizza dough. You can use your favourite pizza dough or have a look here for a recipe.
More? Sure, the four cheeses. I took buffalo mozzarella, gorgonzola, parmesan and a fourth very delicious Italian cheese, which unfortunately I (here it comes again) forgot the name of. The cheese was very creamy and in fact you get the most of that cheese when you eat it just the way it is. Yum!
Once you have all the components read, heat up the oven to 250 °C (unless you have a pizza oven). Roll out your dough and thinly spread on some of that tomato sauce. Then scatter as much of the cheese all over the pizza. Make sure to taste small bits of cheese to survive the time until the food is ready.
If you feel like it, you can finish off the pizza with a splash of olive oil. Since we are having an Italian week here, in fact, you can put a splash of olive oil to anything we are having.
My pizza was ready after 15 minutes ... well, I cut it into pieces ...


... and went for it ...


It was so yummy, I could have had more. Luckily, I already had frozen the remaining pizza dough. In time, that would be meal 4, but until then it is resting in piece.
So, if you love cheese, that's your pizza. At least it's mine. Even now while I am writing this done I am starting to salivate again. Or is this due to the fact I had some of meal 3 ...

Meal 3: Lasagne (do I have to say more)

Still I am doing Italian ... thanks to that lovely tomato sauce. I was so glad I still had that much left over.
Another pan goes onto the oven and again some olive oil is heated up.
I have 500 g of minced pork that needs some browning in the pan. Season with salt and pepper. Watch as the heat does it's job. Add the tomato sauce when the meat is ready. Stir through well and heat the sauce up.
Meanwhile you have a sufficiently large tin (mine was 35 cm x 25 cm) ready. Add some - I told you so - olive oil to the bottom of the tin. then lay out a layer of lasagne sheets.
Oh, we would need some kind of bechamel for the lasagne as well, I reckon. Nah, forget about it. We are doing a cheat version. Mix 200 g of crème fraîche with salt, pepper, a large hand full of grated parmesan and an egg.
Next onto the lasagne sheets goes a half of the minced pork tomato sauce, then half of the bechamel cheat, then some lasagne sheets again, followed by the remaining meat, followed by the remaining bechamel cheat. Well, how does that look?
Obviously something is missing. Ah, here we go, I topped the whole thing with 200 g of grated mozzarella cheese and ... you know.


30 - 35 minutes in the oven, which has been heated up to 200 °C, will do. The cheese will turn brownish.
Now you would only need to slice the lasagne up and serve it. Dig in! The lasagne was as delicious as the pizza. Dangerously delicious!


You might get some further ideas and serve a rocket and tomato salad on the side. However, I was satisfied with as it was. After all, I know about all those vegetables hidden in that meal.


When some lovely ingredients smile at you, smile back and get cooking.

Now, what about you, do you have any chain reactions going on in your kitchen? While I don't want to turn this into a blog challenge necessarily, why not share your Food Chain Reaction Stories with us by linking up a post in the comments and ... see what will happen.
Since I also made good use of the leftover tomato sauce, this is a fitting post for Elizabeth's from Elizabeth's Kitchen Diary No Waste Food Challenge, which ... what a coincidence ... is hosted by my own self this month.

Wednesday, 11 December 2013

South African Dinner: Bobotie with Yellow Rice and Tomato & Onion Sambal

Finally I safe one hour travelling time for every day I go to  work. That is even the case when I use my bike to go to work. So I get some exercise, although up to know it's quite exhausting to get back home after work, and I get more time at home.
One thing I can do with that, is concentrate more on cooking and baking. I even might have the chance to work some of the puddings and cakes off with my exercises. Then maybe not, but I should do more sweet stuff anyway.
Today, though, I am not focusing on the sweet side ... although ... hm ... there might be a slightly sweet touch in the dish for today. It's for Bloggers Around the World: South Africa.


So I am having some Bobotie with Yellow Rice and Tomato & Onion Sambal. I did a little bit of research for that, so I reckon, that's the way to have it ...


Now we have to see how to do it ...

Monday, 14 October 2013

One way or the other Red Hokkaido Squash Soup

From what I gather by looking around, it's time for squashes and pumpkins. Really? Yes, I would say so. What do we get out of it? For example, I bought a Red Hokkaido squash. Well, I didn't have to go that far and travel to Japan to get it. From it we can get vitamin A and vitamin C, calcium, potassium and iron to mention just a few. Furthermore it is low in calories and sodium. That is, if you are caring about nutrition facts and ... eh ... calories. However, I guess we have to mess around with the calories anyway. But at least you can say, the calories didn't come from the squash.
We are going to have some soup. One day I was invited by some friends ... eh ... just a moment, I invited myself and ... we had some pumpkin soup. Some time later I tried to recreate that soup without having the recipe. 


I may have gotten it slightly wrong, but I will give you some alternative ideas, too. So you can have it one way or the other ...

Tuesday, 23 July 2013

Go Swedish with Pickled Herrings, Köttbullar and Äggkaka

I'm having my Swedish days right now. I started by buying some Daim chocolate. Right now I am well stocked on it. I only need to be careful not too start eating from it in a non-self-controlled manner. So far things are working well.
In fact, I didn't just go and buy chocolate. Right while I was writing down the Bloggers Around the World post for Sweden, I knew what I was going to cook and, of course, bought things for that, too.
Somehow I had a travel brochure from 2011 about Sweden in my possession. Today I have no idea, how I came to have it. Blank, no idea at all. Anyway, there was a picture of Äggkaka in it and I thought ... I am going to have it ... whatever it is. What is it then? 

Thursday, 4 July 2013

Hot Fusion - Hot Chilli Puff Pastry Tarte

Cold fusion: Hypothetical type of nuclear reaction that would occur at, or near room temperature. Usually you need millions of degrees for a fusion of nuclear kind of reaction. This is a controversial subject. The whole concept appears to defy the laws of physics. Some scientists believe cold fusion to be a real phenomenon and that it will be at one point in the future, however far far away, the basis for an abundant, cheap source of energy. Others say that cold fusion is impossible.

Well then, it's quite good, we are not dealing with cold fusion today, but with hot fusion. How do we come to this point?
As it happens to be I'm busy trying to grow my own chillies on the windowsill.


Having them is one part, but actually it's not for the sake of growing, but cooking. I need to do something with them. These are (were) my only two habanero chillies. Those are considered to be quite hot ... and so something else should be, too ... Yes, I'm referring to the weather. Some days it might work out.
Ahem ... what to do now with the habanero chilli? I just took the yellow one. The green one still needs some time. Fine, I could do a chilli, a real hot one ...

Tuesday, 19 March 2013

Cheesy Meatballs with 'disgusting' all-in Chili Sauce

Disgusting! Since I was disposed to this word spoken by a friend of mine in his typical Yorkshire accent at various occasions I came to use it too often as well. Yes, I know, that is disgusting!
While I don't want to classify the following cheesy meatballs as disgusting, you have to judge for yourself as regards the chili sauce.


The meatballs themselves are based on a recipe by Jamie Oliver: Mountain Meatballs. I simply adjusted at to my personal amounts and availability. 
The chili sauce contains a little bit of this and a little bit of that. I will roughly state the ingredients, but the real content has to remain shrouded in mystery.

Ingredients Meatballs:
1 red onion, finely diced
300 g minced meat
1 tsp Dijon mustard
1 tsp dried oregano
A few bashed cumin seeds
1 tsp bashed up coriander seeds
1 handful of breadcrumbs
1 egg
Salt and pepper
50 g grated cheese

Ingredients Chili Sauce:
1 onion, finely chopped
5 cloves of garlic, finely chopped
Tomato puree
Honey mustard BBQ sauce
Water
Curry ketchup
Sweet chili sauce 
Coffee liquor

Method:
Heat up some olive oil on medium heat and then soften the red onion dice in it. 10 minutes will do. Remove the onion pieces from the pan and put away to cool down.
Then start the sauce and do the same with the stated onion as you did with the other onion. Hm ... sounds strange to me ... ah ... forget it ... no worries ... just do it. Then add the garlic.
Meanwhile you can also start heating up your oven to ... eh ... let's say 250 °C.
Now add all your other ingredients for the sauce to the pan, bring to the boil and then reduce to a simmer.
Back to the meatballs ... mix all the other ingredients apart from the grated cheese together and form ... eh ... 4 large meatballs out of it. Get a quarter of the grated cheese ... wait ... that's about 12,5 g and press it into each meatball and close with meat around it so the cheese is more or less in the center of the meatball.
Throw your meatballs into an oven-proof dish and transfer ... no throwing here ... to the oven for 25 minutes.
In the meantime the sauce is disgustingly bubbling away. It gets more and more sticky ...
The 25 minutes are over. Remove the meatballs ... don't burn yourself ... and pour the disgusting sauce over the meatballs and ... shove the dish back to the oven for 15 more minutes.
After that you still can decide whether to eat it or not. Well, surprisingly the sauce didn't taste disgusting as to be expected or announced. It rather tasted interesting.
Oh, I know what people mean, when they say interesting. It's the polite way of saying disgusting. But, really, it didn't taste like that. Frankly, it was rather good. It simply was a sticky mix of sweet and hot and ... there is only one way of finding out ...

Thursday, 11 October 2012

La Vita e Bella - Random Ingredient Recipe


Everyone knows, that it is not easy to keep the crowds happy. So I can imagine that it is a challenge as well for Dom from Belleau Kitchen, who is doing the Random Recipes blog challenge. Every month he is to come up with something, kind of new preferably.
As I see things, though, he doesn't seem to have any difficulties with that. Therefore, month by month by month we are all having a good time joining him in Random Recipes.
This time it is rather a random ingredient challenge - grabbing something from the depth of your cupboard and ... go for it.
Well, my cupboard is not so deep. I'm well organized (really?) and can see all the things I have. The only thing is, there is not one cupboard I can put my hand in and randomly pick something from.
Due to this I went through my various storing places to look for all this ingredients that went off in 2007 ... no ... I used them last month already .... no, just kidding, I don't have or had any of those. Still it could easily happen that you have things that are already off for quite some time or are very very close to it.
This search revealed the following items, which I should start to think about on what to do with them:

- nori leaves
- lasagne sheets
- sesame seeds
- urid lentils
- rose water
- jar of plums
- jar of beetroots
- vermicelli noodles
- cassava flour
- rosecco beans
- pearl barley
- apple compote

You probably know, how things are. In the shop you see something and think, oh that might come in handy. It would be lovely to cook something with it.
Then months pass and you don't.
From the above list we now need a participant. It's time to roll the randomizer and count it out. I could be in for some sushi, Italian pasta, Indian daal, a nice cake or pudding.

And the winner is ...

... no sushi ...

... no cake ...

... nothing Indian ...

... no pudding ...

... therefore it must be Italian with some lasagne sheets.

I have to deal with the other twelve some other time.
It's time to get all those Italian books ready and see what I can do.
The final choice goes to these guys ... 


... once more, as I have used them a few times lately.
Of course then it has to be a lasagne recipe. Again, something very lovely ... la vita e bella (life is good).


Just the other day when I looked into the fridge at work, I saw a package of ready made microwave lasagne ...
It's so much better to do your own. Now you may ask yourself, how I managed to have unused lasagne sheets, that I didn't use for such a long time? Simply put ... I don't know.
Back to work then. 
Or rather, on an evening when I came back from work at about 6 p.m. I decided to do my lasagne.


Starting with the chopping of a carrot and an onion and then letting them sweat in oil in a pan for a while.
Here come the 'good' thing now. After the meat went in and the chopped tomatoes the sauce was due to simmer for ... two hours.
That leaves me with enough time to do all the other things I wanted to do at home, like caring for washed clothes and do some other housework ... lovely ... really?!
Careful calculations then lead to the conclusion it will take roughly about three hours until I get my dinner. A bit of a downside, but I should survive. After all ... you can always start with the pudding.
In between I had to care for the white sauce as well so I would be able to assemble things after the two hours.


Now just some 40 minutes more and I will be ready for eating. Well, the dish I put it in was a slightly bit too big, but ... no worries ...
It tasted lovely ... I bet a lot lot lot better then those you buy from the supermarket ... 
That was needless to mention.
The book said: serves 4. Well, I don't know about that ... la vita e bella!

Friday, 1 June 2012

Egg inside - Scotch eggs

Another beautiful day - not! Or was it? What makes a good day after all? Does it solely depend on the weather: "When the sun is shining, I'm shining, that is smiling, that is happy!" It can not be denied that the weather has a great influence on the mood.
When it's all grey outside and the sun is in hiding, there is certain kind of food that can help you to ease the pain. I'm not writing anything about this today. For some it would have to do with chocolate or ... I don't know.
Well, there are other things ... and other foods in life.


Flowers also help when everything is grey outside. It was very nice to see that the orchid finally made it and the first flower opened. Hopefully, more are to follow. I don't know too much about it, though. However, it is not good to neglect the plant, but to water it regularly.
Nevertheless I don't want to go into botanical details. If I would ask my father, he would be the better person to do it.
Let us talk about food then, about Scotch eggs in particular. I have already seen them a few times before, but never had the chance to eat one so far. Therefore during the last few weeks the desire to try one grew.
As i just read, Scotch eggs, were invented, if you can use that term in this connection, in the year 1738. Or does it rather originate from an Indian dish. Whatever the case, I wanted an egg coated with minced meat and then fried.
So I went through several cookbooks of mine, including the one with the Indian cuisine (so it might originate from there), and mixed the ideas and ingredients from those various recipes together...

First of all, we need some eggs. It would not be right to torture some hens to get them. Due to this fact, I used some eggs of free range chickens. Sometimes I even have the chance to get some eggs through my workmate, because his parents have some hens.
What I imagine, when I think of cream eggs ... oh no, I'm totally wrong here, I mean Scotch eggs (ugh, thinking of chocolate again), is that the egg yolk in the center is still a tiny bit runny (so the cream eggs fit a bit). Will this work out?
A pot with water goes onto the stove and the eggs are bound to end inside the pot. But somewhere I have this tool to put a little hole in the eggs to prevent major disaster while cooking. Where is it?
Let's have a look in my drawer, where I have all the tools loosely hanging around ... ouch ... what idiot put those sharp blades in there? Well, um, it could only have been me ... A small intermission then for treating the cuts. OK, it's not that bad, all fingers still there.
To cut things short - boil the eggs for about 7 minutes or let's say 6 minutes. I did 7, but the result was not absolutely satisfying.

Then we need meat, minced meat. Why not a bit of experimenting ...


... no just kidding. She is still fine, hopping around happily.


You might, well, call me boring, or ... things ..., but I decided to use the meat of some lovely ... have a guess ...


Merguez sausages! Sorry, couldn't help!


Here we go then for the meat:
take the meat of about 400 g of fresh sausages
one shallot
one clove of garlic
one green chili
some sea salt
a two cm piece of ginger
a tsp of ground coriander
and ... nothing else (except you have a brilliant idea - then let me know)


Cut the shallot, garlic, chili, and ginger into very small pieces, having them on the same chopping board and maybe going through the bits and pieces again and again with the knife.
Mix everything well with the meat.
Then get yourself a few plates ready: one with a whisked egg, one with flour, and one with breadcrumbs.
So, get rid of the egg shells and roll the "naked" eggs in the flour (did I mention, that I used four eggs?). The meat you have already before divided into four parts and flattened them.
Somehow you manage to "wrap" the meat around the eggs respectively.
The resulting meatballs go to the bowl with the egg and get soaked with egg, only to be coated afterwards with the breadcrumbs.
The only thing we have to do now, is to fry them in hot oil, rolling them through the pan to get all sides (of a ball?) to a nice colour.
Afterwards you can enjoy your Scotch eggs, or shall I say Indian eggs with ...


 ... a few salad leaves and some tomato wedges.


 You could also serve along a few other things. Maybe this ...


Or even a potato curry, that is of course only if you have one at hand ...


It's up to you anyway. Whatever you like, whatever you have at hand. Depends maybe also where you live.
So, when you never have tried a Scotch egg before, why not have a try. It's simple. You can maybe experiment even a bit more ...

Sunday, 27 May 2012

Turkish Pizza: Lahmacun

The problem is, when I have a certain image in my mind of wanting something special to eat, I'm not satisfied, if I get it only in a different way. Did this sound logic or understandable. Or should I say: When I want something, then I want it in certain way, or I am not happy with it. Whatever, forget it.


In the town where I grew up, there was this Turkish food place called „Sivas“ something. They used feta cheese and chillies on their doners and lahmacums. But not often I have found something like this again, if at all. Then you have to do it yourself again.
So, let's try to do our own lahmacun. The word lahmacun come from an old Aramaic expression which means "meat with dough". So that's what we are going to have, more or less.

Ingredients:
500 g flour
7 g dried yeast
300 ml lukewarm water
250 g minced meat (lamb or beef)
400 g of tinned tomatoes
one onion finely chopped
1-2 cloves of garlic, finely chopped
oil for frying
parsley
salt, paprika, pepper, chili flakes
2-3 handful finely cut iceberg lettuce mixed with lemon and olive oil
200 g sheep (not cheap) feta cheese (nice creamy Turkish one)
some pickled Turkish chillies

Method:
Sift the flour into a bowl. Add a pinch of salt and the yeast. Bit by bit add the water and turn all into a nice smooth dough. Maybe you don't have to use all the water. Or you might end up with the dough being too wet. Then you go and add more flour and it is too dry, then you add more water and it gets too wet, then more flour ...
So better be careful in the first place to avoid this back and forth thing. When you finally managed to get the dough right and you didn't use the double amount of flour you can put the dough for rising in a warm place and cover it with a wet kitchen towel and leave it for one hour. 
Meanwhile you can give your attention to the sauce for the pizza. Heat up some oil in a pan and put the garlic into it. You get a nice garlicky smell. If that happens and before the garlic gets black (you definitely don't want that), add the onion to the pan and continue until they get nice and soft.
Then it's time for the minced meat to go into the pan so that you can fry it through. Once that is done, you can pour the tinned tomatoes in. Fill the tin halfway with water and pour it into the sauce as well. Season it properly with all the lovely seasonings you put ready for this dish. Make sure that you get it right. If you know that others don't like to have it spicy and you don't plan to share, make it really spicy. If you are rather nice and sensible, watch your seasoning.
The dough should be ready, at least after 60 minutes! Divide the dough into 6 balls. Using a rolling pin roll them out in a fairly round way to approx. 3 mm thickness. If it's not too round, no worries. 
Spread some of the sauce on each "round" pizza base, leaving a small edge uncovered and make sure you don't put too much sauce on. Spread it just thinly.
Bake it in the oven then at 200°C for approx. 20 minutes or until the edge turns golden or light brown. When the pizza bases come from the oven, it is best to continue to work with them and eat them or if that is not going to happen, keep them warm. You could stack them and then cover them with aluminium foil. Only if you have to. I would eat them right away.
Well then: Give some of the salad onto the pizza, some cubes of sheep feta and three chillies. Finally you can roll it like a wrap (if you got the base right) or if that doesn't work just fold it in the middle (I had to do it last time). Enjoy!!!