Showing posts with label creme fraiche. Show all posts

Wednesday, 26 April 2017

Bacon and Asparagus Carbonara

Yes, it’s really happening again. I go through the shop and see vegetables and fruits and other ingredients and I get already ideas what to do with them. Wonderful!
However, when you go after every idea you end up in buying more than you can manage to eat in a reasonable amount or amount of time.
Anyway, this time it was asparagus and mushrooms. As for the mushrooms they still have to wait until tomorrow. Maybe, they go for the breakfast, for even as I am writing now another idea comes up for the other half of the asparagus.

Therefore we are having bacon and asparagus carbonara, for we all know that asparagus and bacon go well together. Yes, originally I wanted to have asparagus wrapped in bacon, but … hey … why not try something different.
As bacon, cream, egg and cheese make a good carbonara, why not toss everything together and go for it.
Here we go …
Ingredients:
A bit of olive oil
200 g green asparagus
100 g stripes of streaky bacon
A few leaves of sage
Salt and pepper
200 g crème fraîche
2 eggs
Hand full of grated Parmesan
Pasta
Method:
Cut the asparagus into smaller, bit sized pieces and the bacon into smaller stripes.
Heat up a pan with a bit of olive oil and throw in the asparagus and bacon. Let it all get some colour. Later you can add the finely chopped sage and a bit of pepper.

Meanwhile you cook your pasta according to the instructions on the package or … as you have done your own fresh pasta … as long as they need.
Still meanwhile you get yourself a bowl to mix in the crème fraîche, the eggs, the Parmesan and some salt and pepper.
Pasta ready? Get a bit of cooking water into the pan and rinse away the remaining cooking water. Toss the pasta with the asparagus and bacon and take the pan from the heat.
Mix the egg mixture with the pasta and serve your meal …

Grate over some extra Parmesan and maybe sprinkle a bit of olive oil over it.
Enjoy!
It was very delicious. I was pleased with the end result and for sure will have some more of it.

Friday, 14 April 2017

Burn a Little - Bean and Feta Enchiladas and Steak

You can’t mess with time. Even if you could go back in time to change things you have done in the past, things will most probably end even worse.
What you could do, though, is a trip on memory lane, thinking about the things that you did and that happened and if you are clever enough, you could also learn from your mistakes. Or you could rediscover things you liked to do.
Anyway, today we will have at first some prawns and later something Mexican. After all we want some food. Some time ago, I bought a bag of Panko – Japanese breadcrumbs. I saw a dish on television – Panko Fried Prawns. For a long time I wanted to try it. Now I did.

Together with some chilli sauce it’s a lovely snack.
Side note: Just keep an eye on how much Panko Prawns you have going in the hot oil at the same time. If you use too many, the oil might just … eh … bubble over and spread on your oven top and … who knows what mayhem that might cause there.
Now we can go on with some Mexican food ...
Bean and Feta Enchiladas and Steak

The original idea was to make some vegetarian enchiladas, which indeed happened, but I felt I needed some more food, so I added the steak to the side. While the recipe mainly focuses on the Bean and Feta Enchiladas, I will mention a few things regarding the steak as well.
Ingredients:
Wheat tortillas
Creme fraîche
Chilli Sauce:

A splash of olive oil
1 clove of garlic, finely chopped
1 small onion, finely chopped
1-3 dried red chillies, finely chopped
400 ml tinned tomatoes
400 ml vegetables stock (or chicken stock for non vegetarian)
1 tbsp. dried oregano
1 tsp. sugar
A splash of red wine vinegar
Enchilada Filling:
A splash of olive oil
1 small onion, finely chopped
140 g sweet corn
1 red or green capsicum, chopped
250 g kidney beans
Salt, pepper
Bunch of parsley, chopped
200 g feta cheese

Method:
First of all, we need to do our own chilli sauce. Start in a sufficiently sized pan with a splash of olive oil at medium temperature.
Chuck in the garlic and the onion and have them work in the pan until translucent. Then add the chillies, the tinned tomatoes, the vegetable stock, the oregano and the sugar.
Bring it all to the boil and leave to simmer.
Now you have plenty of time to prepare the filling for the enchiladas.
Somehow, we start in a similar way, here – another pan and another splash of olive oil at medium heat. Toss in the onion and … you know … until translucent.
Add the sweet corn, capsicum and kidney beans. Season with salt and pepper and let it all simmer for a while until the vegetables have softened a tiny bit.
Remove the content of the pan to a bowl and let it cool down slightly. Then mix in the parsley and the feta.
Check the chilli sauce. If you where not super fast with the filling, you can remove the sauce from the heat now. If you don’t like all the chunks of onion and tomato in your sauce, you can pass the sauce through a sieve.
Get yourself an oven-proof dish, that will hold at least five enchiladas. Lightly oil it.
Then get yourself a plate. Place a wheat tortilla on it and spoon a bit of the chilli sauce on it. Spread the sauce onto the tortilla. Place a part of the filling on the tortilla, roll it up and place it in the oven-proof dish. Pack those enchiladas all nice and tightly in the dish. When all enchiladas are in the dish, pour over the remaining chilli sauce and transfer the dish to the oven for about 30 minutes at 180 °C.

Meanwhile you could prepare the steak, if you wish to have it.
Have some butter in a pan and cook the steak to your liking in it. Once you have removed the steak from the pan and leave it to rest, you have some pieces of tomato and some stripes of capsicum go into the fat. Season them with salt and pepper.
When everything is finished, you can plate up.
Place the tomatoes and capsicum first, the steak on top of it and some roasted onions on top of that (figure out yourself how to get those onions).
Put one enchilada on the side. You can garnish it with some chopped up parsley and add also a spoon of creme fraîche on the side to mellow the effect of the chilli sauce.
Enjoy!
Of course, I used three dried chillies in the sauce, but I didn’t feel it so much. So, don’t be afraid. While the chilli sauce itself might be quite hot, you won’t feel it so much in the finished product.
Lovely! I enjoyed my meal very much and I reckon and I keep on saying, I need some more Mexican food in my life and ... apart from that hot food will help you to burn and by that I don't just mean that it will burn in your mouth, but it could also aid you in burning off some fat you might not like in your body. I guess it always works for me.
Anyway ... keep enjoying your life and ... we will do the same here!

Wednesday, 21 May 2014

Tomato & Asparagus Puff Pastry Tart

The sun is out and shining brightly, warming up everything. What a delight ... if you like that kind of weather. We just had a bit over 30 ºC today. Isn't that lovely? Again, only if you like it that way. Well, I do. However, it doesn't make me feel I have to be out all the time and get as much of the sun as possible, or that I have to have loads and loads of ice cream and cold drinks, including beer. It's fine, Spring is at it's best and you can get a lot of different food items fresh, locally. On my way to work, they have already set up that strawberry hut next to the strawberry field. That means in the coming days after work, when I have made it up the hill and have regained a bit breath, I can go for it. I will see about that.
In the meantime, I finally managed to work a bit with fresh green asparagus. First of all I had those with the bacon wrapped around it to eat together with soft-boiled eggs. Very, very delicious!
Then I went to roast some in my griddle pan. Not bad!
As the last one I tried out this ...


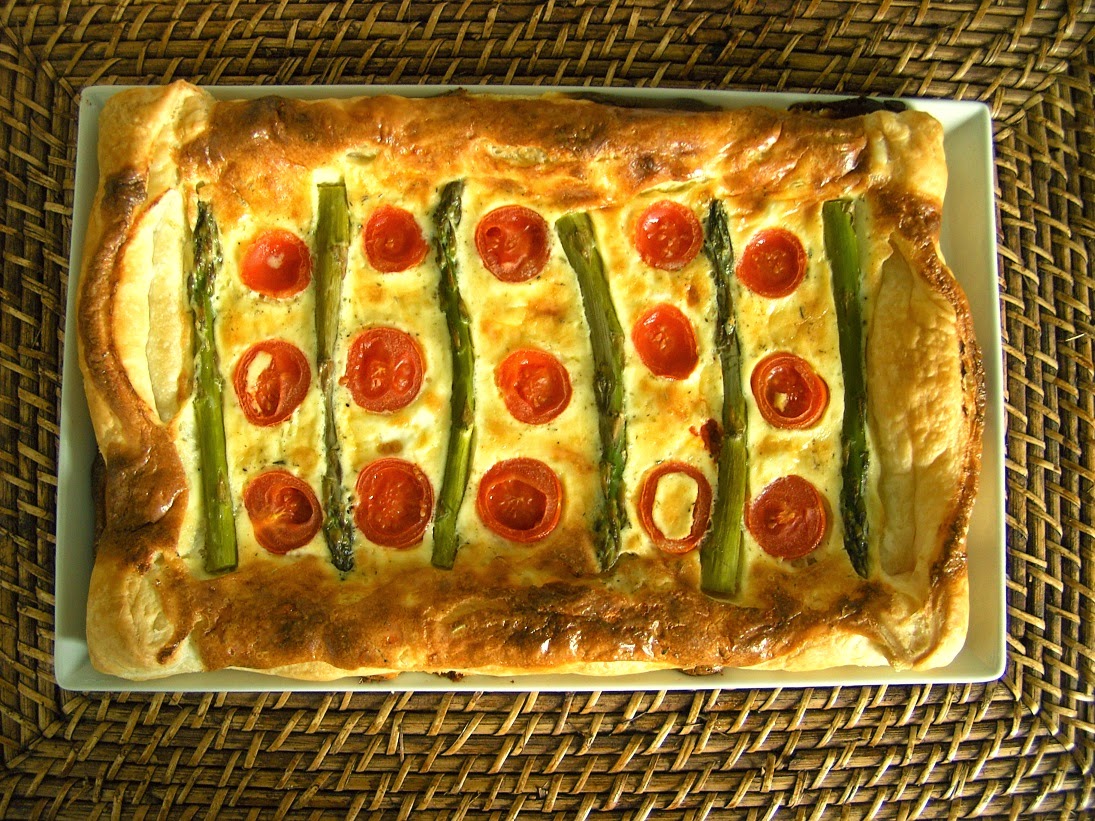
... a puff pastry tart with asparagus and cherry tomatoes. Have a closer look then ...

Ingredients:
5 asparagus spears
5 cherry tomatoes, sliced
Sheet of puff pastry (about 350 g)
100 ml crème fraîche
100 g firm goat cheese
Salt, pepper, Herbs de Provence
1 egg
Olive oil

Method:
To begin with, I blanched the asparagus for about 5 minutes.
Then I broke the goat cheese into pieces and mixed it together with the crème fraîche, egg, salt, pepper and Herbs de Provence.
On a slightly oiled baking tray I placed the puff pastry and folded in the sides a little bit.
After that I spread or rather poured over the crème fraîche mixture. Strangely it went a bit over.
As you see in the picture I placed the asparagus spears slightly pushed into the mixture and arranged the slices of tomato between them.
The tray went to the pre-heated oven at 180 ºC for 30 minutes. Somehow that seems to be my favourite oven temperature and time, strangely. Well, there are many things I don't understand. Also, I feel like drizzling some olive oil over the finished baked tart.
Whatsoever, just make sure that the puff pastry tart doesn't get burned in the oven. You wouldn't want that nor like it.
The way the tomato & asparagus puff pastry tart turned out, it tasted lovely. So, you have to grab the opportunity while it's there ...
Maybe the sun will also shine tomorrow or will even shine for me in a different kind of way ...

Wednesday, 16 April 2014

Warning: Extremely Delicious Vegetable Lasagne


Ha, you weren't expecting this. You thought this crazy guy would give you another one from his loose bottomed tart tin. Nope! Instead I give you something from the bottom of my heart and i hope you will love it too. Today I have a vegetable lasagne for you. 
Simple? Yes, but be warned, in my opinion this vegetable lasagne tastes extremely delicious. Of course, I have to say this, but there is only one way to prove me wrong. You would have to try it for yourself. Besides that, you will also find some ... eh ... what to call them ... eh ... let's try ... twists and an unexpected ingredient.
Less talking more cooking ...

Ingredients:
6 lasagne sheets
1 medium aubergine
2 small courgettes
A few splashes of olive oil
1 large tomato
1 clove of garlic
2 tbsp. tomato puree
100 ml water
50 ml red wine vinegar
A few basil leaves
Salt and pepper
200 ml crème fraîche
1 egg
A hand full of grated parmesan
3 tbsp. grated radish

Method:
The times I made a vegetable lasagne before, was to cook all the vegetables into a kind of sauce. However, we are not doing this today. We like to preserve the pure individual tastes of the single vegetables ... at least most of them. I was inspired to do it in a different way by watching an episode of MasterChef Australia.
Therefore we cut the aubergine and the courgettes in a way they fit to the lasagne sheets, that is they are going to be cut into fine slices. Then get a baking tray ready with some grease proof paper and heat up your oven to 180 ºC.
Be generous with salt to the sliced vegetables. Off into the oven they go for about 15-20 minutes. Just make sure, they don't get burned.
Meanwhile get your tomato sauce ready. Get a pan ready on heat. Be generous again. This time with olive oil in the pan. The ancient principle 'those who give bountifully, will receive bountifully' still applies.
Cut the tomato in small chunks and throw them into the hot oil to let them sizzle away. Finely chop your clove of garlic and toss it into the oil as well. When you start to smell the beautiful odour of the garlic on your kitchen add the tomato puree, the water and the red wine vinegar. Go through the sauce with a spoon and adjust the seasoning with salt and pepper. On a low heat reduce the sauce for a while. When the sauce is thick enough and you are almost finished use the basil leaves to finish off the sauce.
Before we can start putting the lasagne together we have two more jobs to do. The fist one is to pre-cook the lasagne sheets in boiling salted water for about three minutes. The second job is to prepare some kind of white sauce to put between the layers.
For this white sauce we simply ... yes, very simply ... spoon together, the crème fraîche, the egg, the parmesan and the grated radish. Well, I suppose you could use horseradish, too. 
Anyway, I used to have radish when I was way younger and then ... didn't have it for a long time. Due to the fact, that radish is in season right now, I thought I give it a go again. For sure I had something in mind for it, but I just ended up eating most of it raw. So far I never had used radish in cooking. Bravely I decided to grate some of it into my white sauce for my vegetable lasagne. Well, it worked ... well.
After this brief detour into my use of radish we get back to our lasagne. We are almost there.
Now get yourself a 20 cm x 20 cm oven-proof dish. Remember that the oven is still at 180 ºC. We start the lasagne with a splash of olive oil that you rub onto the bottom of your dish. Then a few slices of aubergine follow, two sheets of lasagne, white sauce, courgette, white sauce, lasagne sheet, aubergine courgette, white sauce, lasagne sheets and white sauce.
Well it all depends on the amount of sliced vegetables you have. Feel free to change things a tiny little bit. Just make sure, you have three layers of lasgane sheets.
Before the vegetable lasagne goes into the oven, grate some extra parmesan on top and while you are at it allow some olive oil to be drizzled on it, too.
The lasagne should go into the oven for about 15-20 minutes. It may look like this afterwards ...


You see, there is a bit of colour on it. If you want more, you have to give more. This vegetable lasagne will make for four humble portions, but be warned ... I said it before ... it tastes extremely delicious. So you might want to plan ahead for this.
Whatsoever. serve the lasagne with a few spoons of the tomato sauce on top.


You know, if you add more sauce there is more of it to enjoy and it will all drip onto your plate and you might want to do something with the plate later.
In my opinion, this vegetable lasagne was the best I had so far. You can still taste the aubergine and the courgette individual and you have a gorgeous tomato sauce, too.


I can only recommend to try it for yourself. I might be wrong here, but ... you'll never know if you don't go for it.

Speaking of going for it, this post will go to some blog challenges in no particular order ...

Elizabeth's No Waste Food challenge hosted by Ness at Jibber Jabber UK this month. Fine, I would never have thrown the remaining radish away, but here I used the left over radish in a delicious way.


Javelin Warrior's Made with Love Mondays. Check it out for yourself!

JWsMadeWLuvMondays

Helen's and Michelle's Extra Veg Blog Challenge. If I haven't used some extra veg here, I don't know and then again, I used the radish as I have never used it before.

Extra Veg Badge-003

Camilla's Credit Crunch Munch. Having a vegetarian meal with vegetables either on offer or in season or both will help you to save some money.

Credit Crunch Munch

Manjiri's and Jacqueline's Pasta Please challenge. The theme for April is Olive Oil. No, I wasn't especially generous with it because of this challenge. I just wanted to and found it necessary for the sauce to work properly.

pasta please

The Four Seasons Food April Challenge from Delicieux and Eat Your Veg. The goal was to celebrate vegetables. In my opinion ... again ... this is what this very vegetable lasagne is doing.


Then we have the Simple and in Season challenge from Ren. Do I have to say it again that radish is in season?

Simple and in Season NOW OPEN

Just because I can, I add this post to Recipe of the Week from Emily, too.

Link up your recipe of the week

Last but not least we have Karen's Cooking with Herbs challenge. Guess why?

Cooking with Herbs Challenge for April

Saturday, 12 April 2014

More from the Tart Tin - Quiche Lorraine

Fine, I have a few more things lined up coming from my loose bottom tart tin, simply can't help it. Now it doesn't always have to be sweet, although at first glance that might be fine with me, but I know better that it's far too dangerous to have to much of sweets. Since I don't always get the chance to share finished products, I have to balance the cake and sweets department better with the savoury department.
For that cause I have some Quiche Lorraine for you today, even more balanced with a salad on the side.


Still we get the chance to use the loose bottom tart tin. Oh, I can't exactly remember what the salad was all about, but I have the details of the Quiche Lorraine for you.

Ingredients:
For the pastry:
250 g flour
1 egg
A pinch of salt
4 tbsp. water
125 g butter
For the filling:
125 g bacon, cut into small pieces
200 g crème fraîche
4 eggs
2 leeks, cut into rings
Salt and pepper
150 g grated cheese

Method:
Carefully put together the pastry by rubbing the butter into the flour ... or the other way around ... so you get a mixture resembling bread crumbs. Don't forget the salt. Then add the egg and the water to bring the dough together. Pop it into the fridge for 30 minutes.
For the filling or topping or whatever else you like to call it, first briefly fry your bacon in a pan. Transfer it to a bowl and mix it with the remaining ingredients for the filling. There is no other magic to i. Just do it and thoroughly mix it all together.


Get your oven ready to 180 ºC and butter your tart tin. Oh, right get the dough into the tin and then blind bake it for 15 minutes. I always use some chickpeas for that. Their fate is to remain reserved for blind baking, never to be eaten.
Remove your blind pastry ... eh ... blind baked pastry and top it with the filling or ... fill t with the topping and get it back into the oven for let's say 20-25 minutes or until the quiche lorraine has taken a lovely colour.


Then, I reckon, the only thing left to do is to have your meal. As I suggested before, together with a nice salad and, if you are  in the mood for it, with a glass of wine. For that, of course you have to be a person appreciating wine. Otherwise you might want to take a beer.


It's always something lovely to have a quiche lorraine from time to time. Now they also work better for me and I can enjoy them even more. Before I didn't use to add leeks, but I think they are a good addition.


Still I have more to come from my loose bottom tart tin. Anyway, what would you bake with it?

Saturday, 15 March 2014

Chain Reaction: Italian Week - Tomato Sauce, Pizza and Lasagne

Sometimes one thing leads to another. I like to have some kind of cooking chain reaction, when the leftovers of a meal come to star in another meal or two or even more. I dreamt of five meals or so. Well, I will be satisfied with less ... for now.
It all started with a tomato sauce. No, not exactly, it started when I found some lovely celery sticks and carrots smiling at me. When celery and carrots smile at a man, the only thing you can do is smile back and ... cook with them.

Meal 1: Pasta with Tomato Sauce (call it vegetarian bolognese, if you like)

Before I go on, I just want to tell you, I couldn't find the photos of the pasta with tomato sauce. Maybe that's because I didn't take any.

I put a large pan with olive oil on medium heat. Then I went about finely chopping two cloves of garlic, an onion, four celery sticks and two large carrots. All the tiny bits of vegetable ... eh, maybe I didn't chop them that fine ... went into the pan in order to be soften. Have patience and enjoy the process.
Next I poured a tin of tomatoes (400 ml) into the pan with some extra water. I better should ave taken two tins or a larger one. That's why I added some fresh tomatoes and a bit of tomato puree later on. Oh, some chopped up red chillies will give the sauce some extra heat, too.
It's important not to forget the seasoning. Good I didn't forget it the same way I forgot the photos and (you will see later) something else.
Anyway, now you want to get the content of the pan boiling and then leave it simmering for 30 minutes.
At this point you check the seasoning again. Better safe than sorry.
Now a splash of red wine vinegar comes in handy and ... you have to make a decision. You could just break up the tomatoes with a spoon or put the whole sauce into a blender and ... let things go. I went with blender. I wasn't in the mood for coarse consistency this time.
Finally I added some chopped up fresh basil.
Cook your pasta according to the package instructions, if you are not doing fresh pasta.
Again, if you don't forget, you could catch up some of the cooking water to add to the sauce.
Whatever the case, have a plate of pasta with the tomato sauce and some parmesan on top. It won't disappoint you.

Of course we have some leftover tomato sauce in order to continue ...

Meal 2: Four-cheese Pizza

I had to do this. It was about time I do a post with pizza again. You can never have too much.
I want some tomato sauce for my pizza before I put the final topping on, no matter what it is. At least that is what I think right now. Well, I can't remember it otherwise right now, I forgot it (with all this forgetting, I reckon I am getting old).


Fine, we already have our tomato sauce for the pizza. What else? Of course, the pizza dough. You can use your favourite pizza dough or have a look here for a recipe.
More? Sure, the four cheeses. I took buffalo mozzarella, gorgonzola, parmesan and a fourth very delicious Italian cheese, which unfortunately I (here it comes again) forgot the name of. The cheese was very creamy and in fact you get the most of that cheese when you eat it just the way it is. Yum!
Once you have all the components read, heat up the oven to 250 °C (unless you have a pizza oven). Roll out your dough and thinly spread on some of that tomato sauce. Then scatter as much of the cheese all over the pizza. Make sure to taste small bits of cheese to survive the time until the food is ready.
If you feel like it, you can finish off the pizza with a splash of olive oil. Since we are having an Italian week here, in fact, you can put a splash of olive oil to anything we are having.
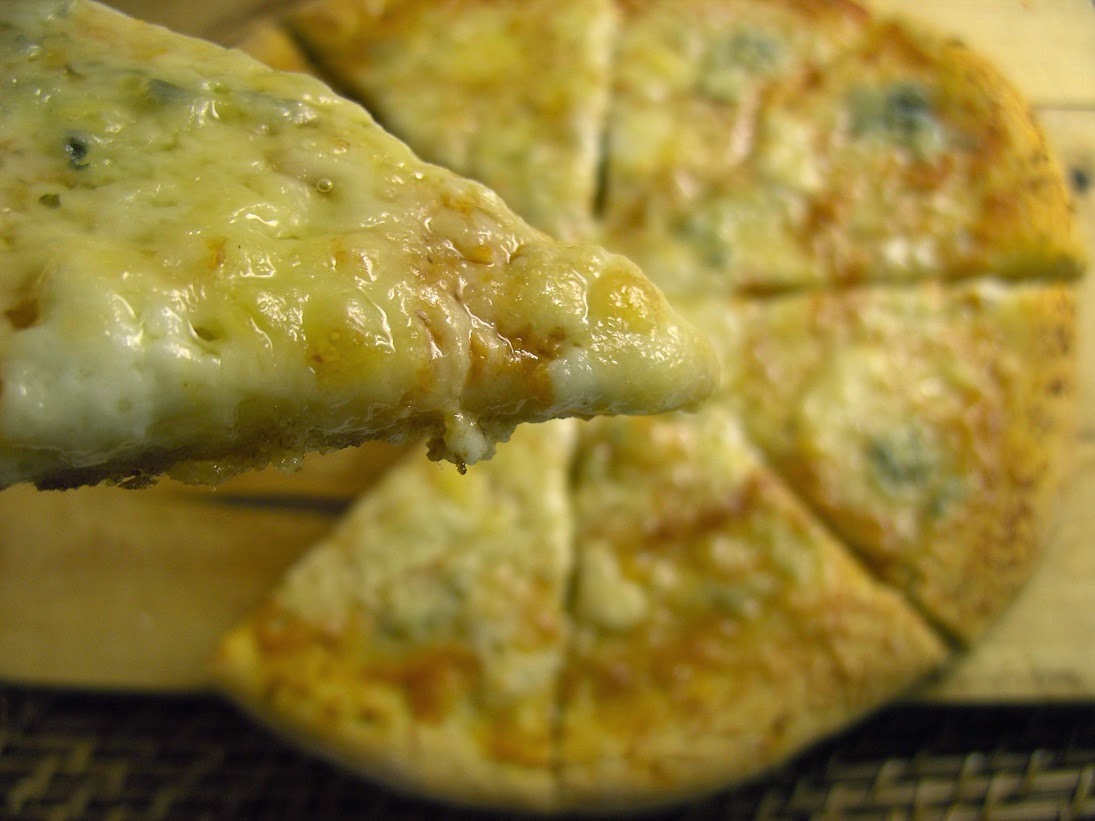
My pizza was ready after 15 minutes ... well, I cut it into pieces ...


... and went for it ...


It was so yummy, I could have had more. Luckily, I already had frozen the remaining pizza dough. In time, that would be meal 4, but until then it is resting in piece.
So, if you love cheese, that's your pizza. At least it's mine. Even now while I am writing this done I am starting to salivate again. Or is this due to the fact I had some of meal 3 ...

Meal 3: Lasagne (do I have to say more)

Still I am doing Italian ... thanks to that lovely tomato sauce. I was so glad I still had that much left over.
Another pan goes onto the oven and again some olive oil is heated up.
I have 500 g of minced pork that needs some browning in the pan. Season with salt and pepper. Watch as the heat does it's job. Add the tomato sauce when the meat is ready. Stir through well and heat the sauce up.
Meanwhile you have a sufficiently large tin (mine was 35 cm x 25 cm) ready. Add some - I told you so - olive oil to the bottom of the tin. then lay out a layer of lasagne sheets.
Oh, we would need some kind of bechamel for the lasagne as well, I reckon. Nah, forget about it. We are doing a cheat version. Mix 200 g of crème fraîche with salt, pepper, a large hand full of grated parmesan and an egg.
Next onto the lasagne sheets goes a half of the minced pork tomato sauce, then half of the bechamel cheat, then some lasagne sheets again, followed by the remaining meat, followed by the remaining bechamel cheat. Well, how does that look?
Obviously something is missing. Ah, here we go, I topped the whole thing with 200 g of grated mozzarella cheese and ... you know.


30 - 35 minutes in the oven, which has been heated up to 200 °C, will do. The cheese will turn brownish.
Now you would only need to slice the lasagne up and serve it. Dig in! The lasagne was as delicious as the pizza. Dangerously delicious!


You might get some further ideas and serve a rocket and tomato salad on the side. However, I was satisfied with as it was. After all, I know about all those vegetables hidden in that meal.


When some lovely ingredients smile at you, smile back and get cooking.

Now, what about you, do you have any chain reactions going on in your kitchen? While I don't want to turn this into a blog challenge necessarily, why not share your Food Chain Reaction Stories with us by linking up a post in the comments and ... see what will happen.
Since I also made good use of the leftover tomato sauce, this is a fitting post for Elizabeth's from Elizabeth's Kitchen Diary No Waste Food Challenge, which ... what a coincidence ... is hosted by my own self this month.

Tuesday, 7 January 2014

Telly ... Brain ... Plate ... Chicken Pie


While I was doing some research for the Bloggers Around the World South Africa, I came across Masterchef South Africa. Did I tell you this before or am I having a déjà vu? Oh ... either way it would mean my brain is not functioning properly. That wasn't what I wanted to get to.
Anyway, in that episode the contestants where supposed to visit a restaurant, sample a dish and then cook it. Something like that I like as well. Fine, for one team it was chicken pie. From that moment I fancied to make chicken pie. 
Apparently that was about one month ago.
Now I like to share with you what got to my plate after it went from the telly through my (malfunctioning?) brain ...

Wednesday, 17 April 2013

Creamy Smoked Pork Chops Hawaiian ... sorry, no Hula

There is quite some Indian cooking going on in my kitchen right this moment, but that doesn't mean I can't write you some other things, too.
Do you like Hawaiian pizza or Hawaiian toast? Strangely I can't see the direct connection to Hawaii here ... must be the pineapple. However, it was invented or made popular in Germany in the 1950s according to Wikipedia. Didn't give that much thought to that before and I most likely will forget about again tomorrow or one or two days later.
However we want to use that idea now on some smoked pork chops.


Once more, it's no big deal putting it together ...

Ingredients:
600 g smoked pork chops
6 slices of pineapple
200 g crème fraîche
200 ml full fat milk
Black pepper
Olive Oil

Preparation (or call it assembling):
Start heating up your oven to 200 °C. The preparation won't take too long.
Mix the milk and the crème fraîche together. Unintentionally I ended up with a version of crème fraîche that included herbs ... no worries ... if you like that. Season with pepper.
Now get your oven proof dish and put in the smoked pork chops and pineapple ... chop, slice of pineapple, chop, slice of pineapple and so forth.


Then pour the milk and crème over it and add a few little splashes of olive oil.


Transfer to the oven for 40 minutes and ... do something else in that time. You could ready a book for a change.


Eat it with some nice bread for mopping the lovely cream sauce. It would be nice to have a salad with it as well. You will get some ideas. Whatever suits you.


Dig in! Well, since this is not reall to do with Hawaii, there will also be no hula right now, although we might try that another time ... as soon as I figure out ...

Wednesday, 31 October 2012

Encore français - aligot et bœuf bourguignon for #BloggersAroundTheWorld


The warm up is in the past. Now we are ready for the real thing. 
Some time ago I was invited by a friend, who actually is from France. According to him, a usual meal would consist of apéritif - not necessarily some alcohol to drink, although a pastis would work for me - then a salad or soup, followed by the main course. After that we would be ready for the cheese course and we can close with dessert, of course. Really? Maybe a calvados fits in to round everything up.
I don't need to mention, that baguette and red wine would be part of the deal as well, although the alcohol is not compulsory.
Now I would love to present you such a meal. 
Pastis - no big deal. Well, it doesn't have to be the apéritif, because we have aligot.
Many moons ago ... or month ... I read the book Encore Provence written by Peter Mayle. Maybe you have heard of him, or read something he wrote, or even saw a movie.
Whatsoever, in this very book, he mentioned something called aligot. This originates from the Latin word aliquid, that means something. The story behind it has something to do with monks, but I don't want to bore you with any more details.
This aligot contains two important things: garlic and cheese. In fact a large part in it is cheese. So ... naturellement ... I was destined to try it. In other words, the moment I read about it, I knew I would make it one day. So, apart from the garlic and the cheese you need tomatoes, sour cream or the like, salt and pepper, and patience.

To get a bit more detailed, I used the following:
400 g tinned tomatoes, chopped
250 g cheese (one that is a good melting kind)
100 g créme fraîche
2 cloves of garlic, finely chopped
Salt and pepper

Let's do it, or at least have a try:
Before we start, just a brief note. The cheese that would be used in the original one is tome d'Aubrac, that is fresh cheese from the region where this dish comes from.
First of all cook the tomatoes. If you haven't chopped them properly, you can also puree them afterwards.
Once done, add the remaining ingredients and start stirring ... and keep stirring ... stirring ... stirring ... stirring ... stirring.
Hopefully, it will thicken at one point. However, if it gets so thick, you can't stir anymore or even get out the spoon, things went terribly wrong and according to Peter, you should have a glass of wine and start again.
However, I was on the safe side and ... lost patience ... and consequently had to be satisfied with a slightly thinner version.


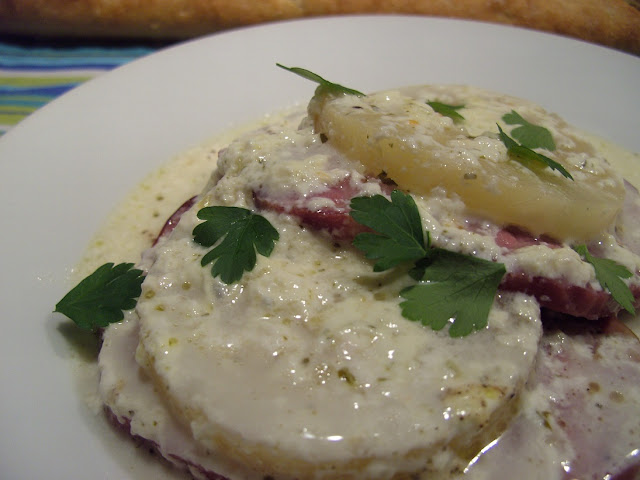
That, in no way deminished the joy of this meal. To you give you a fuller picture ...


Already we feel a bit satisfied. Still, we need to think about the main course. That would be bœuf bourguignon.
In fact for that we have to go a few hours back in time, for you have to start this well in advance. At least that is what I heard. Before that day, I didn't cook it yet.
I had to enlist the aid of some cookbooks among which is the well known Mastering the Art of French cooking. I took that as a rough guide, combining it with other information I read. Anyway, I had to adjust to the amount of food I would need in the end or respectively on what I had in stock.
Here we go for the main course ...

Bœuf Bourguignon
  • Melt 50 g of butter in a pan at a medium heat.
  • Cut 100 g of bacon into stripes and fry them in the butter. 
  • After that remove them to a casserole type dish.
  • Have 500 g of beef, that is cut into about 2 cm sized chunks. Pat the meat dry with ... something.
  • Then fry the meat in the pan, so it gets colour from all sides.
  • Pre-heat your oven to 160°C.
  • Remove the meat as well and ... have a guess ... yes, put it into the casserole type dish and reduce the heat for the pan
  • Now you have two medium sized onions ready, which you more or less have chopped finely ... as fine as you like.
  • Soften the onions in the pan.
  • While that happens add a few tbs of flour to the casserole type dish to coat the meat and then put the dish into the oven for about ten minutes.
 
  • Get the dish out and repeat the flour thingy.
  • By now your onions should be ready. You can turn of the heat for the pan.
  • The onions go the well known casserole type dish. Together with the onions you add a few sprigs of rosemary and thyme, a bay leaf and two peeled and crushed cloves of garlic.
  • Now we top that up with 300 ml of red wine and 300 ml of beef stock.
  • Now cover your casserole type dish and put it into the oven for about three hours until the meat is really tender.
  • Just before that time is over you could prepare some potatoes to eat together with your bœuf bourguignon.

  • When you think your meat is ready ... it is not. Remove the cover from your dish and keep it for another 30 minutes in the oven.
  • Then you are ready to plate up and eat the main course.


I hope you enjoy it! I did! It was very delicious. That would bring us then to our next course ...
If you feel you already had enough cheese at the beginning, this must be an illusion. For sure there is a little bit room for some Camembert, brie or another cheese ... Why not!
What's for pudding?
Well, I felt like I should have a chocolate souffle or some crêpes, but honestly? Yes, I didn't feel like preparing them or even eating some more food. I already had quite some share from the bœuf bourguignon. So I have to do a chocolate souffle at some other time.
Still, I hope you enjoyed this small (?) French meal for Bloggers Around the World.


If you haven't done so already, why not join us on this food trip around the world ...

Wednesday, 11 April 2012

Gnocchi with carrot-rosemary sauce

It’s heating up again. The temperatures are rising. I didn’t benefit too much from it today, a day spent at the office with no view to the outside world, typing away on the keyboard. Must have done that several million times on certain keys, because the writing on them starts to disappear (it's from a certain standard for Ergonomics of Keyboards: a key is supposed to endure 5 million times typing on it before abrading). In other words, it was again a busy day at work.
What does it mean? Coming home and having a quick meal? Eating out? Ordering something? Warming up leftovers? Many options indeed.
In fact there were some leftovers in the fridge. For example in one corner, some baked potatoes were lingering. There came an idea up in me. Some days ago I read something about making gnocchi in the book “Cook with Jamie”. Easy thing to make gnocchi. I have never tried it before, though.
First of all I had to get rid of the skin of the potatoes and mash them up and season with nutmeg, salt, and pepper. The recipe stated to add a medium sized egg yolk. Wasn’t there some leftover egg yolk in the fridge as well? No, only leftover egg white. I added another one to that to get my egg yolk. To finish off the gnocchi dough some flour is needed. Depending on the amount of potatoes you need one or two handful (two, if you are using 8 medium sized potatoes). I didn’t have so many potatoes, so I just put in some flour and kneaded until I got a nice dough (or as I have read lately somewhere: until it looks “doughy” - Signe Johansen).
The “doughy” dough gets rolled out until it looks like a sausage and then you can cut it in 2,5 cm pieces. Those go to rest on a bed of semolina flour in the fridge.
Well, here we would have some nice gnocchi. However, what goes with it?
I must admit, they look larger then they should be

Ingredients:
250 g of bought or rather self made gnocchi
100 g  Bacon (or just take more if you want to)
3 large carrots (or more smaller ones)
1 shallot
100g of Crème fraîche or double cream
1 lime
A few sprigs of rosemary
Salt
Pepper
Olive oil
Some Parmesan (if you like)

Method:
To start off the sauce heat up a pan on high heat and add some olive oil. The bacon joins the oil at first. Meanwhile you can cut the carrots into thin slices. Take yourself some time to do it. No need to rush. If it takes longer, the bacon gets more golden and crispy. On the other hand, if you take too long, it will get black. That we don’t want to achieve. The carrots go to the pan, when you are ready. Then go for the shallot. Slice it thinly. If you don’t manage so thin, no worries. Add them to the pan and reduce the heat. Throw in the rosemary leaves. That smells nicely.
Now is the time to get your water for the gnocchi boiling. Once the water is ready you can add the Crème fraîche to the pan and the gnocchi to the water. After 4 minutes they should be ready. I didn’t watch the time, though. They are also ready, when they start floating in the water. Before that happens, squeeze your lime to the sauce and season with salt and pepper.
You have to see for yourself in which direction you want to have the taste. Accordingly you have to adjust the seasoning. Maybe you are also happy with half a lime. Best to try it first.
When the time has come and the gnocchi are asking to be removed from the water – they are floating – carefully do that and add to the sauce. Mix it and plate up. Grate some Parmesan cheese on top if you want to and dig in.

Did it taste nice? I was thinking about something that Jamie Oliver usually says, about certain ingredients loving each other and being good friends or mates. I thought carrots and rosemary are good friends, if I remember right. I was satisfied with that.
Additionally, I would be ready for a holiday. Maybe I don't have to wait too long for it ... 

Now I found this Blog Challenge on the net:
 
Well, I thought, I could take part and use the above recipe. Now really the time is coming up to get some fresh herbs again from the garden. The windowsills, however, are already getting overcrowded...