Showing posts with label cream. Show all posts

Thursday, 4 May 2017

Millenium Falcon Salted Caramel Cake

May the fourth be with you!
Again another year has rolled passed. While I don’t care much about any kind of holiday and special cooking and baking for it, I like May the 4th – Star Wars Day, well I like the pun on the phrase “May the force be with you!” Fine, I liked the movies, too.
But that’s it. Ah, well, when I have the chance I bake something … and I reckon, I will go to the cinema to watch episode VIII in December.
However, I am not going to send a model of a spacecraft into space in order to get some attention. Hm …!?! Maybe I could sent a cake of a spacecraft into space …
Anyway, during the weekend I was talking to a friend and he suggested I could maybe make a Death Star cake. Nah, that would be too much work. What about some cupcakes. We arranged some batter and added green food colouring. After baking, the idea was to add some marzipan to make them look like Yoda heads. Well, the cupcakes didn’t turn out that green and the homemade marzipan not that good for modelling, although it tasted very yummy due to the addition of Amaretto.
Then I got an idea for May the 4th …

A rough sketch of the Millennium Falcon from Star Wars that would help me the next day to build a Millennium Falcon cake.
We would need a sponge and some sort of filling or topping. I did some more pondering and researching …
I wanted something with caramel and cream cheese. A quick look at the basics again for achieving it and we are off to shopping. Maybe a marzipan cover would be lovely.
Shopping ready! Now, let’s go for it …
Ingredients:
Sponge:
225 g butter
225 g sugar
4 eggs
225 g (self-rising) flour
1 tsp baking powder
Vanilla extract
Pinch of salt
Salted Caramel Sauce:
200 g brown sugar
85 g butter
120 ml cream
Vanilla extract
1 tsp fleur de sel (or sea salt)
Buttercream:
225 g butter
115 g cream cheese
Vanilla extract
The salted caramel sauce
400 g icing sugar
Method:
Don’t worry, the sponge is just a standard sponge as you might use for a Victoria Sponge cake as well. So, if you don’t feel like Star Wars, have a normal round one, but …
We feel like Star Wars now. After all, John Williams is assisting us through the whole process. So turn up the volume of your speakers. Yes, it would be best this post comes with a soundtrack,but if you want to hear anything, you have to put on the music yourself.
Fine, “Bake we must!”
Take a bowl, add the butter and the sugar for the sponge and get whisking … until it’s fluffy.
Yeah, I don’t know whether that is fluffy, but that’s the way I’m gonna use it. Crack one egg into it. Beat it. Crack another egg. Beat it again. Next egg. More beating. Last egg. Finish beating. Add the vanilla extract.
Now sift in the flour and the baking powder. Don’t forget a pinch of salt. Incorporate everything to get a smooth batter.
For the baking the oven is heated up to 180 °C.
Line a baking tray with baking parchment and spread the batter on it …
Like this it goes into the oven for 25 minutes.
At this point you could be tempted to start the salted caramel sauce. Don’t do it! see where you can tidy up things while the sponge is baking.
Remove the sponge from the oven and give it time to cool down.
Now you can feel free to start the salted caramel sauce. Get yourself a saucepan and add the brown sugar and cover it all with water. Place the remaining ingredients for the sauce nearby …
Put on the heat … full power … energise!
The sauce seems a bit tricky. Obviously, you can’t see when the sugar starts to get an amber colour, for it already has such. Hear it is, where you need to use the force, you need to feel it. Well, you don’t have to close your eyes for the next step, but if you want it, go for it.
Reach out with your senses and feel the caramel getting ready as the liquid is bubbling away. You will sense a change in the bubbling or a tremor in the force …
When that happens, reduce the heat from full to medium, get a wooden spoon into your right hand … eh … or left hand, if you prefer that. Start stirring.
Throw in the butter. Stir and watch it melt away.
Pour in the cream and watch it distribute, stirring all the time.
Add the vanilla extract and the fleur de sell (sea salt), while you continue stirring.
At this point, I turned off the heat and continued stirring with the remaining heat until the caramel sauce stopped bubbling. Then set it aside for cooling.
Back to the sponge. I cut it into half and placed one piece above the other to follow my Millennium Falcon blueprint to cut it out of the sponge.
Hm … it looked … okay …

That will do. In order to be able to proceed here, we need the buttercream ready.
Another bowl, some more whisking and we are ready …
Add the butter and the cream cheese to the bowl and whisk it together. There goes another bit of vanilla extract.
The salted caramel sauce isn’t that hot anymore, so we can spoon it into the bowl as well and mix it in thoroughly.
Bit by bit we add the 400 g icing sugar. That sounds like awful a lot. No worries! Combine it all well. Ah, that looks like awful a lot of buttercream. Fine, we are going to use it all up anyway.
Spread a layer of … let’s say one third of it … on the bottom sponge …

Carefully place the top sponge … eh … on top of it. No big deal, huh?

Use some of the sponge cuttings to create a satellite dish, a round object placed on a wedge.
It’s time to use up that remaining buttercream and cover the whole cake in it. Give it your best to get the cream on. If you have any cream in undesired places, I’m afraid you have to remove it and eat it up. Well, that’s what I did.
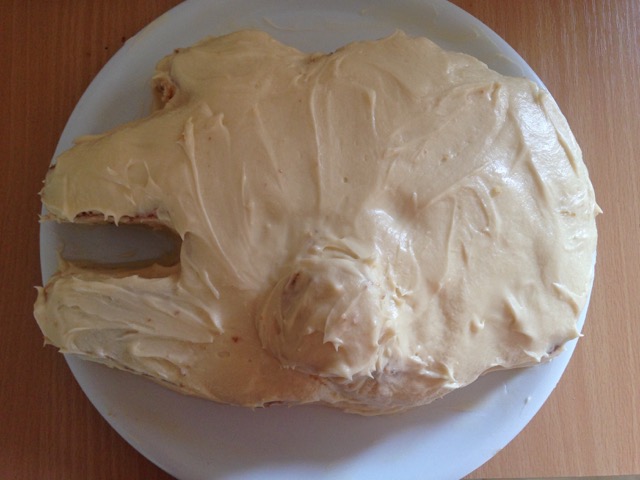
Hm, you get an idea of the Millennium Falcon at this point, but we still can do better with some chocolate buttons and a bit chocolate from a decorating pen …

That’s it. In order for my cake decorating skills to improve, I reckon I have to do a few more cakes. Well … if I get any ideas, that is.
When I was younger … much younger … I never had a Millennium Falcon model, but now I have a Millennium Falcon cake and … the only thing can do with it, is eat it up. However, considering the over 500 g of sugar and the amount of sugar in it, I guess, I have to enlist the help of others to deal with the cake. Otherwise I’ll have a BIG problem.
So, if you are i the neighbourhood anytime soon …
Well, I had a model of a TIE-fighter once. I already thought of making some TIE-fighters with cookies and marzipan or even a marzipan X-Wing, but … that would have been a lot harder.
Speaking of marzipan, there was no room for a marzipan cover here, so I definitely have to make some more cake involving that soon.
For the time being, though, I wish you a lovely day and … if you feel like it … share some of your Star Wars Day creations in below in the comment section.
Otherwise, have a delicious Salted Caramel cake …

Friday, 28 April 2017

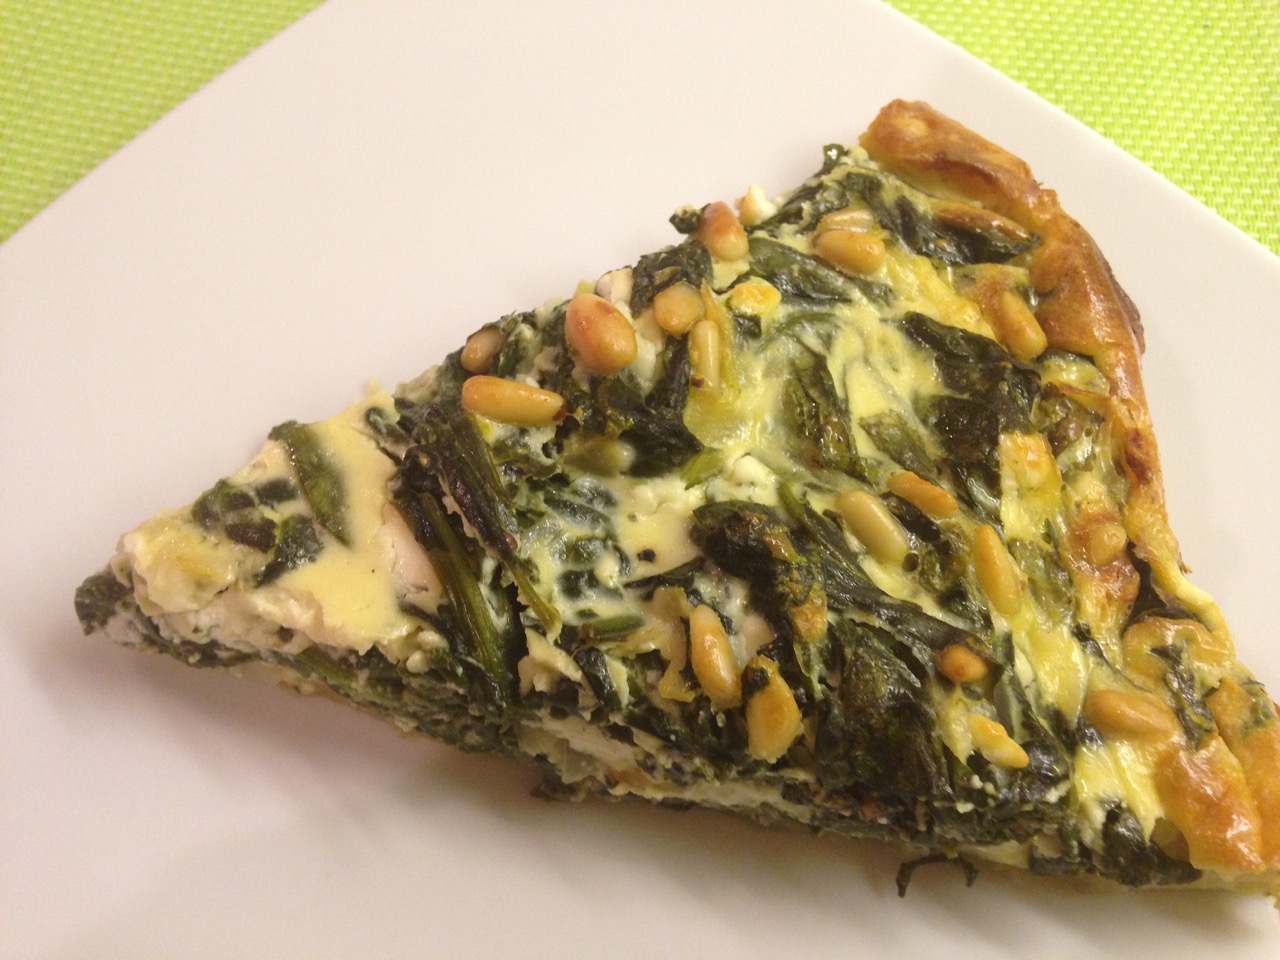
Spinach and Feta Tart

I am really feeling great. Life is beautiful, and so is my lovely wife. Surely I am feeling wonderful and in part it is also because I stick to the three pillars of healthy living: regular exercise, health diet and sufficient sleep.
Sometimes we tend not to belief in simple advice, but … usually there is only one way to find out: try it!
Accordingly, in order to find out, whether you like my dish for today, you simply have to try it: Spinach and Feta Tart. 

Well, there was some kind of pondering going on in my head, whether I should call it Spinach and Feta Tart or Feta and Spinach Tart. Looking at the ingredients, there would have been other options, too, like Spinach, Feta and Pine-nut Tart. Continuing from that one, yet more options would have been possible: Feta, Spinach and Pine-nut Tart or Pine-nut, Spinach and Feta Tart or Pine-nut, Feta and Spinach Tart. Then there is the option of abbreviating things: SF-Tart, FS-Tart, FSP-Tart, PSF-Tart, PFS-Tart, SFP-Tart or SPF-Tart … and we haven’t even mentioned there is garlic involved as well, nor is there any hint towards the kind of pastry used.
Nothing of that doesn’t really matter, so we stick with Spinach and Feta Tart. After all those are the main heroes. Here we go with the recipe …
Ingredients:
400 g puff pastry
Knob of butter
1 onion
2 cloves of garlic
500 g spinach
1 tsp. nutmeg
200 ml cream
200 g feta
80 g pine-nuts
2 eggs
Salt and pepper
Method:Lightly oil your tart tin. I just rub it all over with butter, fine only the inside of course. Then line it with the puff pastry. It could look somewhat like this …

In a large pan, melt the knob of butter and then add the finely chopped onion and garlic. Fry them until translucent. Get your fresh spinach ready and wilt it down in the pan, even bit by bit when your pan can’t hold it at the same time. Season with nutmeg.
Get yourself a large bowl and mix the crumbled feta, cream, pine-nuts and the two eggs. Once the spinach is ready, incorporate the contents of the pan in the bowl as well. Season with salt and pepper.
All that goes now onto the puff pastry and then into the pre-heated oven at 180 °C for about 30 minutes. Honestly, I always try every dishes at 180 °C for 30 minutes. That’s my favourite baking temperature and time. In between I check, though, if it’s necessary to reduce or extend the time. Once the Spinach and Feta Tart got some nice colour to it, I reckon, we are ready to remove it from the oven.

It already has been a while since I did it and I nearly lost the recipe since I forgot to take notes, but since I have been rejuvenated recently, it worked well with my brain.
At this point, you just need to slice up the tart, serve it and enjoy it.

That should be possible. I don’t know what you think, but the combination of spinach and feta somehow sounds Greek to me. Just a feeling. If you like to give it a more Greek touch, you should use a few sheets of filo pastry instead of just normal puff pastry. Optionally you could also drink an Ouzo or two while preparing it. It’s entirely up to you, though.
Anyway, dig in …

See you another time then. I only need to watch now, how this rejuvenation thing is working out, how far it will take me back and, whether, it will result even in doing some stupid things …

Wednesday, 19 April 2017

Chicken Macaroni Cheese Apokalypse

Yes, you also know it doesn’t look that good, is not too healthy, will have too much calories and … but you want it, because it brings you comfort and tastes yummy.
We all know such dishes.
Today – using some leftovers from the indecent looking chicken (sorry, if there were any disturbing or offensive images in my last post) – I’ll bring you my Chicken Macaroni Cheese Apocalypse …

So, what do you associate with ‘Apocalypse’? Death and destruction?
Wrong!
If you know your Greek, you’d say ‘revelation’, for that is what the Greek work apocalypses means. So … the question now is, will this Chicken Macaroni Cheese be a revelation?
Let us see! For sure it will be very different from what you had before. Hm … yes … eh … well, different.
You know, you want it!
Come and get it!
Ingredients:
200 g cooked chicken meat, shredded (yes, I used it from the beer butt thingy)
200 ml cream (I would have used double had I any)
200 g grated cheese (sadly I just had 100 g)
100 g bacon (cubes, stripes, whatever you fancy … it’s your life)
50 ml chilli sauce (anyone you like)
50 ml tomato puree
2 cloves of garlic, finely chopped
Some basil leaves, torn
Salt and pepper (because we want it)
250 g macaroni
Method:
Go, get your macaroni boiling. Pre-heat the oven to 180 °C.
Grab yourself a proper ovenproof dish (20 x 20 cm did for me) and go for it. Now that will all sound a bit simple from here on … because it is: Throw the ingredients into your ovenproof dish!
While the macaroni might not be ready yet, your dish might look like this …

With all that bringing your water for the macaroni to oil, even though using a kettle to help you, up to here things are fast and you really have to wait for the macaroni.
No worries, though, once the water is ready, the macaroni will be in under 10 minutes. Rinse and add …

That looks like, it could go to the oven and so it does …
By that time I already knew, I didn’t have a sufficient amount of cheese in it. Another remedy would have been to add a ball of mozzarella, but … I didn’t. Just saying!
Oh, yes, 20 minutes in the oven had to do for me, but I reckon 30 minutes will also do no harm.
At this point, things will look like this …

Yes, I know, it doesn’t look spectacular and it’s not much worse adding this picture at all. Hey, you know what? I do it anyway, because I’m the boss here. No I don’t have any issues in connection with being or not being the boss. I have other issues, but I try to suppress them for as log as possible, at least until I am finished here. You really don’t want to read any about it.
You know, you want something else. So let’s get on with it. What about putting on a bit of garnish?

That should do. I asked an expert about it, although she didn’t knew, what I would be using it for. A little bit of basil can go a long way. In our case it goes here …

Well, fine, you can also place it on the individual serving as I did in the opening. If you can’t resist, you can also drizzle over some extra virgin olive oil over it. Just saying! It’s your life!
Now, is that a revelation or just death and destruction?
Think about it! Answer correctly, if you want to live! It’s your life!
Scared? Sorry, I just have to work on making proper threats, but you know that I know how to find you … ah, just kidding, I wouldn’t really tell or show what I am capable of.
Fine, that’s enough. I better get out of here before things get out of hand. See ya!

Tuesday, 22 July 2014

Wheat Tortillas with Mango Salsa

Sometimes I think I need more of a certain kind of food in my life. Ha, you say, when you look at my blog, there is a lot of variation. Fine! At times, though I wish I could have certain things more often. Maybe something like that ...


That was the dish for Mexico I totally forgot to blog for the World Cup. No worries. Yes, at times I wish I could have a bit more Mexican food in my life.
Well then, what do you have to do for these little wheat tortillas with Mango salsa?
Obviously you need to make your own  wheat tortillas.
For that I usually take normal wheat flour, add a pinch of salt and then as much cream as is necessary to make the dough come together. However, it will never be more than 200 ml of cream. Then I never used more than 500 g of flour.
Let the dough rest a bit, then separate the dough into individual portions, roll out little tortillas and dry-fry them.
Make your Mango Salsa with half a cucumber, a hand full of cherry tomatoes, a bunch of fresh coriander, one ripe mango, the juice of one lime, one red chilli, a small red onion and a bit of salt.
It's best to cut the cucumbers in half lengthwise first. Then remove the softer more watery inside with a small spoon. Cut the remaining part into small cubes.
Remove the seeds of the tomatoes and cut into small bits. Finely chop the onion, chilli and coriander. Cut the mango into small pieces as well.
Mix all the ingredients together. Maybe a drop of olive oil will do no harm.
Put a spoonful of the salsa on each ready fried wheat tortilla and enjoy ...

Sunday, 15 June 2014

Switzerland - Engadine Nut Pie V2.0

There is a calendar on the wall in the office. It has one large and several small pictures on it for every month. It's Switzerland. What do we see on the pictures? Mountains, trains and cows ... they come to my mind.
Now, what comes to your mind, when thinking about Switzerland. Chocolate? Oh, yes, that's a good one. Swiss bank account? Nah, I don't have sufficient funds to think about that. Neutrality? Well, that doesn't sound to bad. So I try to keep that in mind.
A lot of people, when they travel to Switzerland to the Graubünden area, take the Engadine Nut Pie back home as a 'souvenir'. So far I only have been to the other side of lake Constance, so I could at least have a look at Switzerland from across the lake ... kind of.
Nevertheless, I like to have a take on the Engadine Nut Pie and bring you my version, that is the Engadine Nut Pie V2.0. Not that this is essentially an improved version, but it has some modifications to fit my image of Switzerland in my mind.


I had a look at the basic recipe on the tourist website for Graubünden. Then I went on to modify ...
You know, it's quite easy when you have bits of walnuts from a bag ready for use, but when you have to work yourself through closed nuts and crack them all open to get 250 g of chopped nuts ... eh ... well I stopped 100 g short. I checked also some other recipes. One stated 400 g of walnuts and another one had also some plum jam in it. I looked further and looked, but I couldn't find a version with chocolate in it, but ... come on, Switzerland ... I wanted chocolate in it.
Accordingly, here we go ...

Ingredients:
300 g whole wheat flour (somehow most of the other flour was gone in my pantry)
150 g sugar
150 g butter
2 small eggs
1 pinch of salt

300 g sugar
A few tbsp. of water
150 g walnuts
50 ml cream
100 g plum jam
100 g chocolate, into pieces

Method:
Take the flour, the 150 g sugar, the butter, the eggs and a pinch of salt, throw them into a bowl and have some pastry from it. You work it out. Looks like shortcrust pastry anyway. Nicely bring all the ingredients together.
Have your cake tin ready and put a bit more than half of the dough on the bottom of your oiled cake tin, having the dough going slightly upwards at the side. Spread the plum jam onto the bottom.
Give the remaining 300 g of sugar with the water into a pan at full heat and have some caramel going. Make sure not to stir. When the sugar goes brown and the caramel is coming, toss in the nuts and add the cream. Now you are allowed to stir.
Pour the nut caramel over the plum jam. Afterwards throw the chocolate over it, too.
Finally you have to manage to put the remaining pastry over as a lid. I wasn't very good at it.


Yes, it looked like this after baking. So, put the cake tin into the cold oven and turn up the heat to maximum. After ten minutes reduce the heat to 180 °C and let the pie in the oven for another 35 minutes.
As you see on my photos, the Engadine Nut Pie, I made didn't look that lovely, but ... oh, did it taste delicious. You just have to imagine that touch of plum, the nut caramel and the chocolate. I loved it.


Fine, after the Engadine Nut Pie comes from the oven, you have somehow remove it from the tin and also allow time for cooling down. Then you can enjoy it, too.

What now? I reckon, you had sufficient time to think about what comes to your mind when thinking about Switzerland ...


Look out for more World Cup countries cooking ...

Sunday, 4 May 2014

Beware of the Dark Side ... Raspberry Chocolate Tart

"Is the dark side stronger?" "No! No ... no. Quicker. Easier. More seductive."

A long long time ago in a kitchen far far away ...


In fact, it wasn't so long ago and not far far away. Well, the kitchen might be just around the corner, but still ... you have to beware of the dark side, for it is very seductive ... eh ... this raspberry chocolate cake is very seductive and if you don't beware and have more pieces of it than you reasonably should, you can imagine what can happen.

Well, I show you anyway ...
This Raspberry chocolate tart is based on a recipe from Jamie Oliver's Cook with Jamie.

Ingredients:
For the pastry:
150 g butter
100 g sugar
A pinch of salt
250 g flour
1 egg
30 g cocoa powder
For the filling:
100 ml full fat milk
400 ml cream
250 g dark chocolate
2 eggs
... and raspberries

Method:
First of all, we go for the pastry, naturally, for it has to rest in the fridge for at least an hour. So, cream together the butter and the sugar. Then add the pinch of salt, flour, egg and cocoa powder. Carefully bring all the ingredients together to form the dough.
After the hour, get the pastry into a greased loose-bottomed tart tin (you knew that would be coming one day again). Blind bake the pastry for 12 minutes at 180 ÂºC.


Now you can already prepare the filling. Add the milk, cream and sugar to a suitable sized pot and carefully bring to the boil. Stir once in a while. Then take the pot from the heat and add the chocolate. Stir it until the chocolate has melted away and you have a smooth mixture. Then whisk in the eggs one by one.
Pour the filling onto the blind baked pastry case and get it back into the oven at 170 ÂºC for 15 minutes. After that leave the raspberry chocolate tart some time to cool. Wait? Why raspberry chocolate tart? Fine, after a while, place the raspberries on top of the tart, pushing them into the chocolate filling. Use as many raspberries as you wish. Are you satisfied now?


When you go for it, you can even add a dollop of whipped cream, crème fraîche or vanilla ice cream., but ... beware of the dark side ... and May the 4th be with you ...

Casa Costello

Now I have added this post also to Bake of the Week at Casa Costello.

While we still have time for thing, it's good as well to add this to May's Calendar Cakes, which is being hosted by Rachel at Dolly Bakes.

Calendar Cakes Challenge

Monday, 24 March 2014

Melting Moments with Cream and Jam

I know, I've just posted something sweet. Nevertheless I do it again right now. There was a selection on my table of various posts to choose from, but since there is just one week left of March and I still wanted to do a real post for Bloggers Around the World - Great Britain. Browsing through my British Tea Time cookbook I came to the conclusion I should have a go at melting moments.


Just thinking further for a moment I wanted melting moments with cream and jam.

Ingredients:
150 g butter
80 g icing sugar
1 tsp. vanilla extract
1 egg
150 g flour
Pinch of salt
Whipped cream with yet some more vanilla extract (or use some clotted cream, if you have)
Your favourite jam (I used strawberry jam with even more vanilla in it)

Method:
As you can see from the list above, it's all about vanilla. Hey, vanilla is absolutely gorgeous and when I have the chance to use it in something sweet, I go for it.
Now let us have a go at the dough for the melting moments. First of all we start by creaming the butter with the icing sugar and the vanilla extract. 
Then comes the egg and a bit more beating.
If you are in the mood you can add the pinch of salt and sift in the flour. If not, add the pinch of salt and chuck in the flour.
Mix everything well together so that you are able to make little balls of dough afterwards.
Have a baking tray with baking paper ready and heat up the oven to 180 °C.
Choose your right kind of size for the balls depending on how big you want your melting moments. I went for slightly larger balls as you normally would. Place them in distance on your tray and slightly flatten them with a fork.
Bake them for 15-20 minutes until golden brown, but not burned. Make sure you really have the right temperature. I mixed things a bit up, because I am not 100% familiar with my oven yet. So I baked them a while on 160 °C. In the end they needed a bit longer and not all looked nice.
Whatsoever, cool them on a wire rack before putting them together like sandwiches with your vanilla whipped cream and jam. Right now this moment, while writing this down, I think of how lovely it would have been to use some lovely Cornish clotted cream to put between the two halves ... maybe next time. Or just imagine it would be.


After then you can enjoy them with a nice cup of tea. So, when you are observant it's no big deal and you have some lovely melting moments with vanilla and cream.
On the other hand, though, when the time for strawberries has arrived in your neighbourhood you can go ahead and make your own strawberry jam as well. That would be something great. In the meantime then, you have to be satisfied with the best jam you can get.

Wednesday, 19 February 2014

Lord of the Cupcakes ... Peanut and Bacon Cupcakes

As strangely as you know me, I had an idea for a blog post. It was supposed to go somehow like this ...


Three Cupcakes for the gluten-free under the sky.
Seven for the chocolate-lovers in their halls of stone,
Nine for Mortal Men doomed to eat,
One for the Dark Baker in his dark kitchen
In the Land of Sugar where the Calories lies.
One Cupcake to rule them all,
One Cupcake to find them,
One Cupcake to bring them all,
and in the sweetness bind them
In the Land of Sugar where the Calories lie.

Well, well, well, that was about the idea. Logically there were supposed to be baked goods on it. Here we go ...


Now, the question would have been, totally hypothetical, of course,whether that would be the one cupcake for you ...

Saturday, 21 December 2013

No Piece of Cake ... Blackforest Gateaux Pudding

Wonderful, it says NOW we have winter on the calendar. I'm glad we are having not, but ... I don't mind a bit f snow on those days I'm not travelling on the road. Is that too much to ask for? I reckon it is indeed.
Is it also too much to ask for to want a Blackforest Gateaux without the extensive work it takes to create one? No, it isn't. We simply skip this cake part and have it is as pudding. Hm ... somewhat like this ...


It simply came to my mind as someone mentioned Blackforest Gateaux. Now I had to do it ...

Thursday, 5 September 2013

Catch my Drift - Surfer Cake

Have you seen the 2012 Australian movie Drift? Well, it's about surfing and ... hm ... also about courage and the will to survive against all odds.
Hm, at least the last part is fitting: "survive against all odds". So far I am doing good. About surfing, no I can't do it. No matter which direction I choose, there is no coast nearby, where I could even think about learning to surf. No, not the internet, that's not so much fun.
Anyway, doing some kind of sports in the water would be good for me, I suppose. Unless ...


Maybe I really should think about a change of location some day ... at least one can dream. Yes, it has been there for already quite some time. That could be a reason, why I watch such movies.
Anyway, we are not here for surfing today, but for baking. I hope, you catch my drift on that cake ...

Saturday, 20 July 2013

You have been hacked - Lavender & Chocolate Semifreddo

Have you been hacked? No, I'm not talking about your Twitter or Facebook account, nor about your blog in the way that they have been hacked and strange posts appear. By that standard, my blog must have been hacked quite some time ago.
However, you might be hacked in another way. If you believe, you can only be happy when you buy certain brands, you have been hacked. If you believe, you need a lot of money on your bank account in order to be secure, you have been hacked. If you believe, that people need to be able to contact you anytime and anyplace, you have been hacked. 
We just could go on while talking about things that the system wants to make you believe you need to have it or do it in order to find real happiness. That is not going to happen that way.

Sunday, 23 June 2013

Don't make a mess ... Strawberry Pavlova

I simply couldn't resist! While being on the local farmers market, strawberries were smiling at me. When strawberries smile at you, the only thing a man can do is ... go and buy them. Said and done! It was just a spur of the moment thing. I didn't have much in mind to do with them, apart from eating, which of course would be sufficient in itself.
However, as soon as the strawberries were in my possession, the mind started working. What do I still have at home and what do I fancy? Oh, I could do a simple cake with the strawberries on top. You could enjoy that with a dollop of cream.
"No", I said to myself "you are not going to bake anything!"
Well, then, I could make a mess, an Eton Mess. That would be lovely. Fine, you need meringue for that. I don't have any on stock and I don't want to go and buy some anyway.
What now? I could do a dish with courgettes and egg yolks at another time, which would leave me with some unused egg whites.

Accordingly I took myself a medium sized bowl and another one for storing and separated three eggs. The yolks went into the fridge for later use.

Here we are with those innocent egg whites. "You are not going to bake anything!" Right? So I turned the oven to 160 °C. The egg whites got one or two teaspoons of vanilla sugar and - who knows how much - maybe 200 g of plain white sugar. Then I took my handheld electric mixer and went on working the ingredients together.
If you would try to make meringues properly, you would go and first stiffen the egg whites until they form soft peaks and then add the sugar bit by bit and make things shiny. I couldn't be bothered at that time.

I prepared a baking sheet with baking parchment and just poured the content of my bowl on it. The tray went into the oven for 1 hour. That can be quite some time if you have some strawberries smiling at you. There is only one thing a man can do, when strawberries are smiling at him ... as a result I worked myself through the strawberries ... bit by bit.
At one point I restrained myself and did something else.

The large meringue was ready and I put it out to cool. Of course, you could leave it in the oven with the oven door slightly open and leave it to cool there. I couldn't be bothered.

I had some cream in the oven waiting eagerly to be put to great use. A bowl ... cream poured in it ... some more vanilla sugar ... and the mixer again. 
Now, if you are as skilled as I am, you manage some of the cream to spill out of the bowl before it is completely whipped. Whatever!
I squeezed a few strawberries and mixed them with the cream.

The cream in that state came over the meringue and then ... what was left of the strawberries, cut into quarters.


That didn't look that bad.  After all that, there were still enough strawberries left. Normally I would just eat it and don't think further about it, but in blog world, things need names.
To make a short story long, I can't dance. What does this have to do wit it? Here we are. Pavlova came to my mind. As far as I remembered it is some kind of dessert with meringue. So I checked it on Wikipedia just to make sure my mind was working correctly. It was.
According to Wikipedia, "Pavlova is a meringue-based dessert named after the Russian ballet dancer Anna Pavlova." Right, I still can't dance and if I could, it would for sure be far from called ballet. Ah, maybe I can dance a tiny bit after all, But how could I know.
So just one more fact I found out during my research. Pavlova (not the dancer), at least that is what is believed, was first created after or during on of Pavlova's (yes, the dancer) tour to Australia and New Zealand in the 1920s. This dessert was created in honour to the ballet dancer Anna Pavlova.


Anyway, this particular dessert was not created in honour of her, but rather in honour of the strawberries that smiled at me and in honour to my stomach, which needs some delicious treats from time to time.
Another interesting thought, I could have made a mess - Eton Mess - using the very same ingredients. Just a thought. Simply five simple ingredients and you can even make different things out of it. Have a look again ...


With that now, I can't claim anymore, I never made a Pavlova. After all, that must be a Strawberry Pavlova. However, I still can claim, I can't dance.
Now I go and continue to make a mess (NOT an Eton Mess) ...

Sunday, 16 June 2013

Seafood Diet - Ultimate Caramel Chocolate Delight

Have you ever heard someone say: "I only have to look at food and I put on weight."? That totally applies to me. If I see food, I put on weight. Maybe that's due to the diet I am on ... kind of. It's a seaefood diet. Of course, if I see food, I am going to eat it. I'm not having it as decoration. Along that line, the following will do a devastating job. This wasn't a reference to it not being decorative. Let someone else judge. We are talking of putting on weight and my Ultimate Caramel Chocolate Delight.


It has it all ... lots of sugar, cream, butter and of course chocolate. They will do their part. No doubt about it.
In a previous post, I had a Hazelnut Chocolate Custard Caramel Cake. I warned you beforehand the quest isn't over yet and we have to tread further upon that path. You might notice that the recipe is quite similar, but then also different.
Let us speak no further about ... eh ... things. So, without any further ado I bring you my Ultimate Caramel Chocolate Delight.

Ingredients (he he he ... you see what I mean):
200 g flour
100 g brown sugar
200 g melted butter
100 g rolled oats
300 g sugar
50 ml water
100 ml cream
100 g hazelnuts
200 g dark chocolate
50 g butter

Method (not listening to any kind of warnings):
Have you compared it to the previous recipe and noticed the changes already? No? I show you now ... kind of.
First we go for the base with the flour, brown sugar, melted butter and the rolled oats (which are new here). Do a thorough job in putting these together for the dough. Press the base into a cake tin that is prepared with baking parchment. I used a round cake tin, but will use a rectangular one next time.
Bake the base for 20 minutes at 180 °C. After that you might think about allowing some time for it to cool down. A good thing, we are not going to use the oven anymore in the course of this recipe. We did so last time, though.
While that cooling business is going on, we devote our time to what has to be done: the caramel. Put the 300 g of sugar together with the water on the heat. Hopefully it will just go brownish without burning. Allow time for some patience. In the rare case you don't have it, learn it. That's a useful quality you will need again and again in life.
Don't burn the caramel. Before that happens, add the hazelnuts and the cream. You will love that noise, when the cream hits the burning hot caramel. 
Make sure it all mixes well and looks thick. In case it doesn't so right away, I guess you can not avoid, but have to let it on heat and stir it a bit. At one point, though, it should be enough. Things only need a certain amount of stirring. It's like in real life.
Now you should pour the caramel onto the cake base ... if we want to call it a cake. Oh ... it was the original plan, but ... just read on ...
Should I say now: "Allow time for cooling."? Eh ... no ... I don't like to say it. We have work to do. After all we want the Ultimate Caramel Chocolate Delight. Nobody is going to help me finish the job after all.
At this very point our attention is drawn to some beautiful and yet inconspicuous dark chocolate. We need some heat again. I have my special way to melt chocolate and you for sure have your own. So don't let us talk further about it. Fine, I only need to mention that you melt the chocolate together with 50 g of butter.
Once you get this shiny liquid chocolate ready, let it cover the caramel. I would say now: "Allow ...", but ... just make sure the chocolate gets solid again. A fridge might do the trick.


Now have a closer look at this. From what you see, it might be some kind of cake. Let us get our weapon ready and attack it by cutting out a slice.


Well, it tastes great. For me this is my Ultimate Caramel Chocolate Delight. I will try no further in that direction. I'm going to use my time for other food endeavours. What about cheese and chocolate now? Or maybe some other kind of food that will not be so quick in aiding you in putting on more weight. Whatsoever, I will see ... you will see ... we will see.
Back to the original topic.
However, I would not so much eat this as a cake, but rather as a kind of Caramel Chocolate bar. Or just have it as small rectangular slices like shown in the first photo. That way maybe we are not completely lost when we see it ... and consequently eat it - seefood diet! I don't know what you expected when you read the title. Another option would have been: Seafood diet: eat everything, but seafood.