Showing posts with label pepper. Show all posts

Thursday, 6 July 2017

No Need to Argue - Braided Herb and Cheese Bread

If there is one thing this blog and my blog posts are known for, it's the ridiculous thoughts I have time  and again. However, you shouldn't take everything I said so serious. That would just be a disappointment. You know, I am not twenty one anymore and I am not so sure, whether I could or should be dreaming my dreams. Whatever the case, this blog will never be empty or devoid of food and I hope I will not be changing into a food writing zombie (whatever that is). Don't be so sad, though, if I can't be with you all the time. Right now, I am having a good time, it's summer, the sun is shinning and if I look outside it's not the time to watch while the icicle melts.
By now you should have found out, that there really is no need to argue. Nevertheless, I have no idea nor plan how ever I could use the terms Yeats's grave and daffodil lament in any causal sentence here during this blog post, even if I would include an ode to my family.
While I like writing song based blog posts, I would like to dedicate this one to The Cranberries studio album No Need to Argue. But why is there no need to argue? I like to be frank with you. I love carbs, gluten, wheat, yeast, bacon and all that stuff. While I have no problems with others eating gluten free or low carb, you don't need to argue with me about these things, I just love my dough.
For that I have some bread for you with all the lovely things.


Fine, go ahead, start arguing about the quality of the photos. Well, sometimes things are good and sometimes they are not

Ingredients
300 ml tepid water
7 g yeast
tsp honey
300 g flour
200 g semolina
salt
basil, sage, mint, rosemary
200 g mozzarella, grated
125 bacon, cubed
pepper

Method
We start with the tepid water in one bowl or measuring jar, as I usually do. We add the yeast and the teaspoon of honey. Let the yeast do its magic. Meanwhile get a larger bowl for the flour, semolina and a pinch of salt.
Then it's time to mix the yeasty water with the flour and get things together for a dough.


Get your share of food fitness by kneading the dough for a while to release the glutens (here we go). At the same time you fry of the bacon cubes for a while to give them some extra colour and all that you want.
Chop up the desired amount of the above mentioned herbs, chop them really finely. Then you can work them into the dough. Yes more kneading. After that you get 100 g of the mozzarella cheese and knead it into the dough as well. Follows the bacon and even more kneading until you have all the goodies evenly in your dough.
I reckon, it's time for the dough to do its thing and rise. Meanwhile you can ... no need to argue .. do whatever you like. Maybe you could watch an episode of your favourite series. While we are talking about it ... nah ... whatever.
Just get it over with. I suggest one hour. Then separate the dough into three even balls.


Get a baking tray with some baking parchment ready. You might want to heat up the oven to 200 °C.
Turn the three balls of dough into ... eh ... three sausages of dough, just a little longer then your baking tray. After that we can go for the fun part, braiding the bread. In my opinion, with hair this braiding is a bit easier and ... if you really have to ... but then again no need to argue ... if you look at the fotos the braiding didn't work that out that pro on my bread, but this in no way diminished the taste.
Once the braiding is finished ... for good or for bad ... spread over the remaining cheese and add some pepper on top and transfer the baking tray to the oven for 20 - 30 minutes. The bread is looking golden brown and ready for ...


... the time to enjoy. For sure you will find a good way to do so. You will find something lovely to eat on the side.


That whole thing might be a bit dangerous for me as I could go ahead and finish off that bread just that. No need to argue!

Friday, 18 July 2014

Summer Salad with Strawberries

So, here we are. Where? I don't know. Here it is supposed to be summer. The biggest event on this blog is gone now for some days and I have to get other things moving again. Back to normal? If ever I was normal ...
Well, there are still a few things I did before that are still on my list to blog away. Today we are going to have a salad for a change. I hope it's fresh and colourful enough so you like it. I was satisfied with it.
We have a mixed salad with strawberries. I went picking them from the strawberry field nearby and originally I wanted to go back for more, but now all the time I have a few spare minutes to do so, it's raining. Tough!


Ingredients:
Iceberg lettuce
Tomatoes
Cucumber
Walnuts
Red bell pepper
Strawberries
Parmesan
Olive Oil
Balsamic vinegar
Salt, pepper

Method:
Mix 1 part vinegar, 3 parts olive oil, salt and pepper to make a simple salad dressing.
Then cut all the vegetables, fruits and nuts into small pieces. Carefully mix it all together and serve with the dressing and some shavings of parmesan.


Well, that wasn't really much, but what else can I say about it ... hm ... tastes lovely. OK, you could still add a bit of parsley on top, if you happen to have any.

Tuesday, 8 July 2014

In the past I was younger, but now ... Vatapa

That's a ridiculous thought! In the past I was younger. Although I know that for sure, I am not quite so sure whether I'm already feeling it. Today at work already half way through, I thought it could be over now, because my energy was gone and yesterday evening I was totally shattered. Somehow, it seems, I can't do the things anymore I was able to do five years ago. Somehow! Ah, that is really ridiculous! There ought to be a different reason for all that.
On the other hand, today, I am able to do things I wasn't able to do five years ago. Something like this ...


That's a Brazilian dish called Vatapa, a stew with fish, prawns, cashews and coconut milk. Fine, I had read something about it a month ago and we already had an entry with this dish for Bloggers Around the World quite at the beginning, but I didn't read anything about it lately.
So today, I just went for it without looking at any recipe, with just the key-thoughts in mind: you have to use fish, prawns, cashews and coconut milk.
Well, I let you know some more details now ...

Ingredients:
Splash of vegetable oil
1 small onion, finely chopped
2 medium sized red peppers, roughly chopped
1 small red chilli
4 small tomatoes, quartered
100 g salmon
100 g prawns
100 g cashew nuts, roasted and salted
165 ml coconut milk
150 ml water
3 spring onions, chopped up
A hand full of chopped fresh coriander
Salt and pepper

Method:
First heat up a sufficiently large pan with the vegetable oil and start with the chopped up onion in it until those pieces go soft. Try not to cry while chopping the onion, though.
Good, if you want to serve the dish with rice, it might take as long from this point on as it takes to prepare steamed rice, at least in the way I use to do it.
Back to the pan, we add the red peppers, chilli and tomatoes. Cook for a few minutes, so the vegetables start to soften up a bit, but we still want to have some crunch on those peppers in the end.
Time for the fish, prawns, cashews, coconut milk and water to join. Bring everything to the boil and let it all simmer for 10-15 minutes. If you want to reduce it more, increase the time, but then the rice will already be ready before you are finished (that shouldn't be any problem) or the peppers might go to soft. Choose for yourself, what you like.
Just before you are finished, check the taste and adjust the seasoning with salt and pepper, if you have to.
Now add the spring onions and chopped coriander. It's time to serve, it's time to eat, it's time to enjoy. I did!


I would say now, this dish is for the World Cup Bloggers Around the World as Brazil is playing Germany today. For Germany I only have some beer in the fridge. No, I don't think the colours of the labels have any meaning as to the German flag, although on this photo it might look like it. 


I might try the left one of them later today. It's called Marc's Chocolate Bock. That sounds intriguing. I would never have thought about buying those beers would it not have been for a 20 % discount at the shop due to the World Cup. This 20 % was on any kind of beer. So people were really pushing out beer from the shop in truck loads.
Anyway, I will see whether that beer was worth its cost. After all one of my workmates recommended it to me. He knows a lot more about beer than I do, but then on the other hand, everyone has to find out for himself, what he likes or not.


Enough about beer! I am not going to do any advertisement for beer here right now. No one asked me to and I have no time for it now.

Well, I also want to add this post to the No Waste Food Challenge. I wouldn't want to miss that one this month. This month Anne from Anne's Kitchen is hosting on behalf of Elizabeth from Elizabeth's Kitchen Diary. After all I saved those red peppers from annihilation as they were far too advanced toward that direction already. Good, it was time for the prawns, too as they were freezing away in the freezer already.


As a conclusion ... I might not be 20 anymore, but since then I have learned a lot and I don't want to trade in this experience ...

Monday, 16 June 2014

Germany: Käsespätzle (Swabian Cheese Noodles)

I still can ... do another post along the World Cup games. The next few days might get a bit more stressful, so that the chances are limited then. Well, Germany ... hm ... fine, I'm there very often ... fine, most of the time. Often I ask myself, why? Fine, but not now. Often I ask myself, what is a typical German dish? Shall I say, Bratkartoffeln (fried potatoes) or Currywurst with chips? Anyway, potatoes are often involved, but as in many Western countries around the world you have very often dishes from other countries, maybe here in Germany Italian or Chinese food. So, sometimes I ask others what is a typical German dish? The answer I got today was: Käsespätzle. Honestly, I have never eaten it before, maybe only Spätzle without cheese and then only the packed ones. You can so easily do them yourself, as you will see very very soon ...


The following recipe is supposed to be for one person, but when you put a salad on the side, it's for sure for one greedy person (me?).
A tool like this will come in handy, otherwise you have to could the Spätzle from a board into the water.


I borrowed this from a friend, but I am sure you can find something suitable.

Ingredients:
2 small onions, cut in rings
2 eggs
Water
Flour
Butter
Salt
Pepper
Grated cheese (in Germany Bergkäse or Emmentaler would be used)

Method:
I told you, it will be very very easy. After all I did it right the first time I tried.
You can already get a pan ready fry off the onions with a knob of butter.
In fact, you can also get your water boiling, really boiling, bubbling away. Usually that takes some time, too.
Now the dough for the Spätzle (noodles). Crack the two eggs into a bowl. Be careful, to break the egg properly. You can use one half of an egg to measure the amount of water you need to add to the dough. So, add half a shell of water to the mixture. A pinch of salt and now we only need flour. Add until the dough stops to be runny, so it will slowly ooze down from a spoon.
When it is like this, you can spoon it on your plate with a hole and scrape the dough through the holes into the boiling water. Otherwise you have to cut small pieces of dough to let them drop into the water.
They will take about two minutes to cook. Then do with them as they were fresh pasta. Rinse off the water. 
Afterwards put them into an oven proof dish.


On top of that we add the grated cheese and the onion rings. That goes into the oven to melt away the cheese. Check it!


Maybe you could wait a little longer than I did, but ... hey, I was very hungry. I only had a banana for lunch and ... yes, maybe a cereal bar. Ah, right, not maybe. I indeed have a cereal bar as well, although I could have had some more Engadine Nut Pie.
Anyway, meal is ready. Have a simple salad on the side and ... that is, if you have some wheat beer along. Why not!?


Yes, yes, that was totally delicious and totally simple and ... the salad gives you some alibi to make it all a bit more healthy. After all you don't have to have such a big portions of the Käsespätzle and you don't need to have a bear. Some water will do as well.
Finally, I closer look ...


Maybe you know, that Germany won the game against Portugal 4-0 (I didn't even care to watch). Well, I already planned to do this post before I knew, Germany would be winning. That makes four posts in a row for the winning team ...


Friday, 6 June 2014

Miss Smilla's Feeling for Snow - Fish Soup (#ReadCookEat)

I reckon you don't want to hear anything about snow right now, but ... I do it anyway. Where does it say that you have to read books playing in winter and with snow and winter and summer books in summer? Does this aid your imagination or what?
Well, I read a certain book, when I feel like it. There was it on my bookshelf: Miss Smilla's Feeling for Snow or as you would call it in the original Frøken Smillas fornemmelse for sne by Peter Høeg. What shall I say? For sure there are better short summaries of the book online somewhere, but I still give it a shot. 
Smilla, 37 year old daughter of a female Inuit hunter and a rich Danish physician lives alone in an apartment complex. One of the neighbours is an alcoholic. That one has a son called Isaiah. She forms a friendship with him. Suddenly Isaiah dies. The police explains it as an accident, the boy falling from the roof. However, due to his marks in the snow on the roof and some other facts, Smilla does not believe in an accident. She investigates, later together with another neighbour, called Peter. He is a mechanic. Whatsoever, there is some kind of conspiracy and ... the rest you have to read for yourself.
As Galina from Chez Maximka and I myself are still doing the ReadCookEat challenge, it is no wonder I also kept an eye on the food in the book apart from obviously following the real plot.
While I would have loved to go for a raspberry cake I decided for this ...


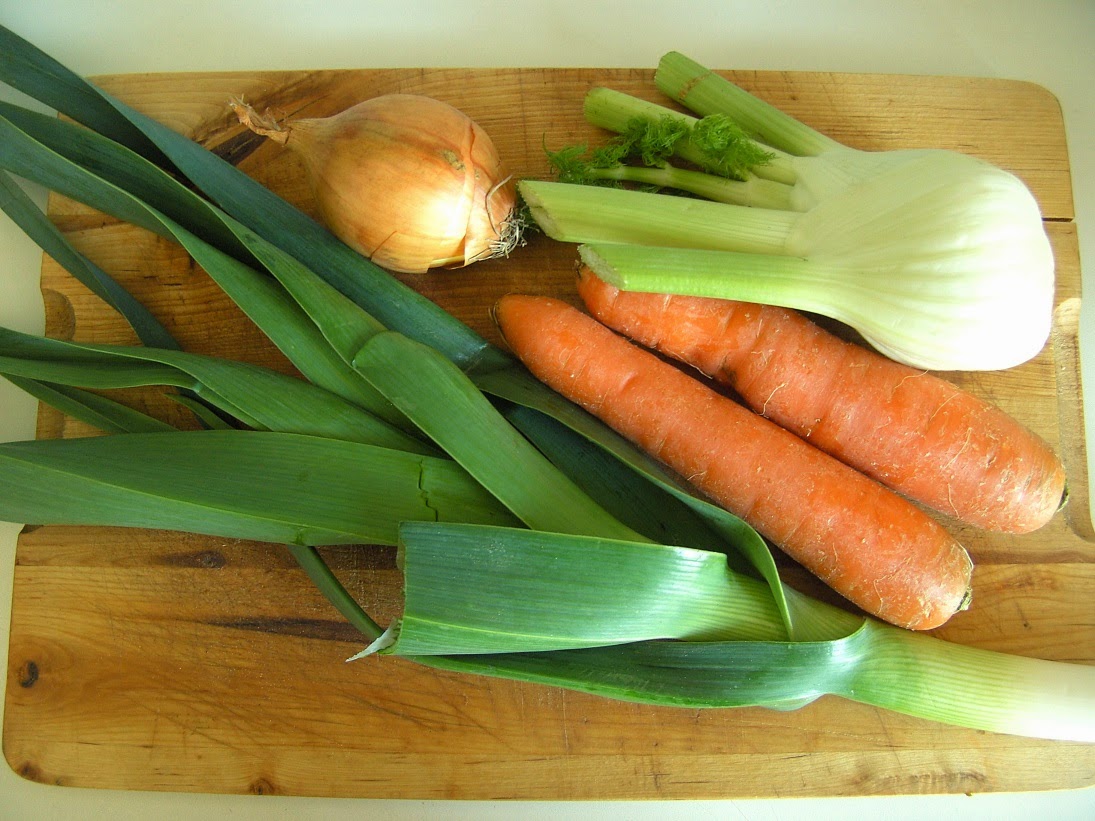
In one scene in the book the mechanic, Peter, is preparing a fish soup for Smilla and himself. The description of the ingredients and the preparation is quite detailed so I tried to reproduce it, although I stuck to the ingredients I could get more easily ... eh ... for what was in that one shop, when I went shopping for the dish.

Ingredients:
Splash of olive oil
1 onion
2 carrots
1 small bulb of fennel
1 leek
Various items of fish (I had: gilthead bream, haddock, salmon)
Hand full of prawns
Rice
2 Star anise
1 tsp. cardamom
2 tbsp. sour cream
Juice of half an orange
Salt and pepper

Method:
I prepared the rice in the usual way with the star anise and the cardamom. I did this in a separate pan. You know, double amount of water, bring to boil, cover, reduce heat to minimum or turn off and let it work for 20 minutes. Anyway, you may have a different method or even a rice cooker. Feel free to do as yo are accustomed to do.


Than start with a large pan to do the soup. Give a splash of olive oil to the pan, which you put on low to medium heat. Chop up your onion and throw it into the pan.
Afterwards go for the carrots. Peel, chop up and off to the pan. Now the fennel and finally the leek. Give the vegetables a good time in the pan to soften them a bit and to release some flavour, maybe 20 minutes or more. Just make sure, you don't burn anything.
In between season the whole thing with salt and pepper and Pour in 1,5 litre or water. All this you bring to the boil and let simmer for 10 minutes.


It's not called fish soup for no reason. Therefore we need some fish in the pan. If you feel you just want to go ahead as I did (with little knowledge about fish) just use whole fish like I did with head, fin and bones and all (as was done in the book as well). However, that might get a bit messy, for later you don't want the head, fins and bones in the finished soup. For your convenience use fillets of fish. That will make your life easier, but you might have less flavour, if you can notice. Just one more thing, you don't want to have the scales of the fish anywhere near your pan. That, of course, if you have a good fishmonger should be no problem at all. I don't have ... a good fishmonger.
Fine, you put your pieces of fish into the pan, pushing it under the liquid and let the fish boil together with the rest for 10 minutes. If you need to remove heads, fins and bones afterwards ... your problem. 
Once all the undesirable parts are removed, add the prawns and cook them for another two minutes. After that you can finish the soup of with the sour cream and the orange juice.


Serve the soup together with the rice and if you like some bread as well.
That was one of the more expensive dishes, for you know, fish isn't that cheap. However, I got a good quality meal and finally some more fish for my health and a more balanced diet. Apart from that, there are some leftovers for another day ... or maybe too.
While eating I still discovered some fishbones in the soup - maybe that's why I don't have fish too often.
Whatever I say, I enjoyed the fish soup and am glad I have some more for the weekend.
Now that's something lovely for ReadCookEat.


Anyway, it wouldn't have been my fault, if the soup would have been terrible, for I followed most of the time Peter Høeg's description.

If it happens to be the case you have been reading something or are still doing so and you find any connection with food in that book and find the power to do a dish, then I see no reason, why you should not join ReadCookEat this month ...


Wednesday, 21 May 2014

Tomato & Asparagus Puff Pastry Tart

The sun is out and shining brightly, warming up everything. What a delight ... if you like that kind of weather. We just had a bit over 30 ÂºC today. Isn't that lovely? Again, only if you like it that way. Well, I do. However, it doesn't make me feel I have to be out all the time and get as much of the sun as possible, or that I have to have loads and loads of ice cream and cold drinks, including beer. It's fine, Spring is at it's best and you can get a lot of different food items fresh, locally. On my way to work, they have already set up that strawberry hut next to the strawberry field. That means in the coming days after work, when I have made it up the hill and have regained a bit breath, I can go for it. I will see about that.
In the meantime, I finally managed to work a bit with fresh green asparagus. First of all I had those with the bacon wrapped around it to eat together with soft-boiled eggs. Very, very delicious!
Then I went to roast some in my griddle pan. Not bad!
As the last one I tried out this ...


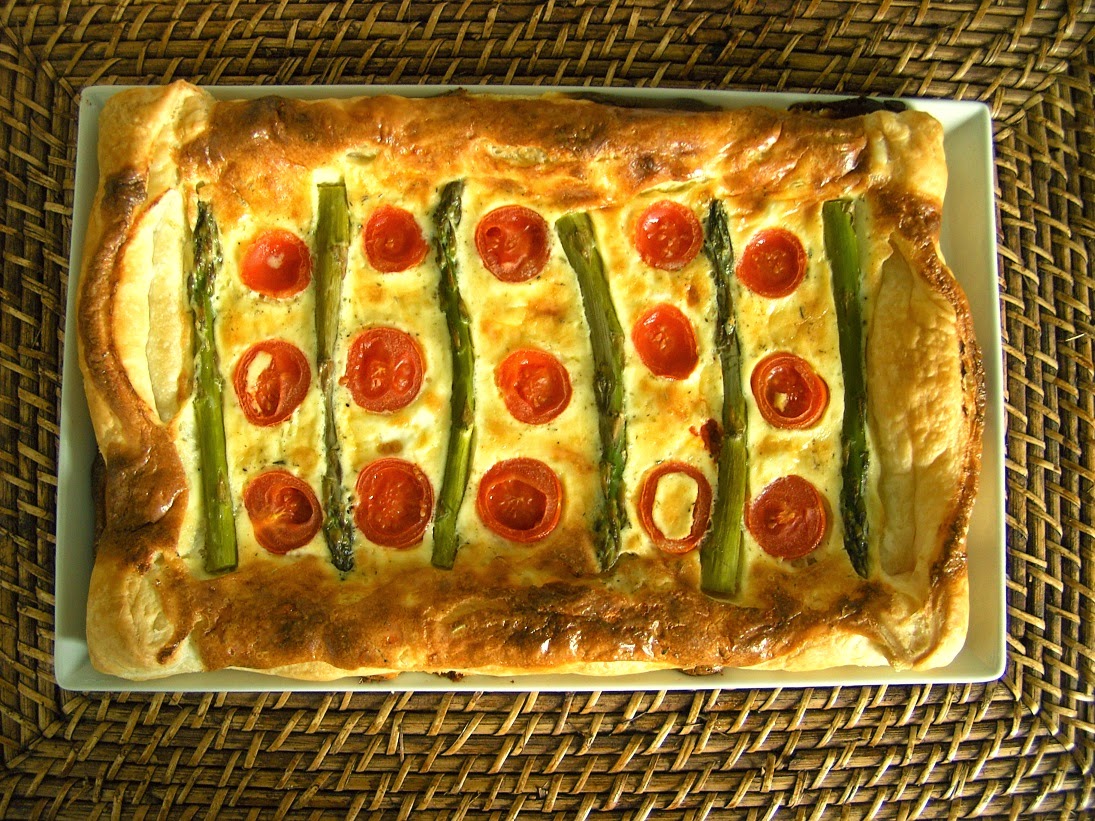
... a puff pastry tart with asparagus and cherry tomatoes. Have a closer look then ...

Ingredients:
5 asparagus spears
5 cherry tomatoes, sliced
Sheet of puff pastry (about 350 g)
100 ml crème fraîche
100 g firm goat cheese
Salt, pepper, Herbs de Provence
1 egg
Olive oil

Method:
To begin with, I blanched the asparagus for about 5 minutes.
Then I broke the goat cheese into pieces and mixed it together with the crème fraîche, egg, salt, pepper and Herbs de Provence.
On a slightly oiled baking tray I placed the puff pastry and folded in the sides a little bit.
After that I spread or rather poured over the crème fraîche mixture. Strangely it went a bit over.
As you see in the picture I placed the asparagus spears slightly pushed into the mixture and arranged the slices of tomato between them.
The tray went to the pre-heated oven at 180 ÂºC for 30 minutes. Somehow that seems to be my favourite oven temperature and time, strangely. Well, there are many things I don't understand. Also, I feel like drizzling some olive oil over the finished baked tart.
Whatsoever, just make sure that the puff pastry tart doesn't get burned in the oven. You wouldn't want that nor like it.
The way the tomato & asparagus puff pastry tart turned out, it tasted lovely. So, you have to grab the opportunity while it's there ...
Maybe the sun will also shine tomorrow or will even shine for me in a different kind of way ...

Thursday, 15 May 2014

Have a Snack - Chilli Cheese Balls

Sometimes when the day is getting late, I feel I don't need a proper dinner, but a snack will be just fine, maybe together with a beer ...


Just like that! Some chilli cheese balls on a bed of rocket together with some serrano ham. Life is good! I'm happy and satisfied! The end of the day can come. I would say that snack has it all ... all those ingredients I love: chilli, cheese, serrano ham and rocket. What more could I want? Oh, I mentioned it already ... a nice refreshing beer.
It's not much work and quick you go and have your snack ...

Ingredients:
Rocket, as much as you want
Olive oil
Lemon juice
Salt
Pepper
4-6 slices Serrano ham
200 g soft goat cheese
Chilli, fresh, dried, flaked, powder or whatever you like, have and want
Small bunch fresh parsley, chopped up
Flour
One egg, whisked
Large hand full breadcrumbs
Oil for frying

Method:
Dress the rocket with the lemon juice, olive oil, seasoned with salt and pepper. Place it on the plate to serve and arrange the serrano ham on top.
Mix the goat cheese with the chilli and parsley. Give it a pinch of salt. Shape small balls from it. Then it's time to get them bread-crumbed. Off to be rolled in the flour, then egg wash and finally breadcrumbs.
Get some oil hot for frying and fry the chilli cheese balls until brown and crispy. Obviously you want to avoid that the cheese gets leaking out.
Lay the ready chilli cheese balls on some kitchen paper to get rid off some of the oil, but hurry, we want to have a snack ...


Ah, I really should make sure I have serrano ham and goat cheese in my fridge most of the time. So, have it as a late night snack or a starter, if you prefer that.
Now, tell us, what is your favourite quick evening snack?

Sunday, 27 April 2014

Adana Soup - Chickpea Soup with Meatballs

Another month has ticked away as have done many more before so. However, these days they just pass by and I ask myself: 'What have I done?' ... and I can't remember. Then things just go on ...
Yes, we have to go on with things. Due to the fact the month already has progressed so far, I don't want to miss to blog my contribution to this month's Bloggers Around the World: Turkey.


This is a simple chickpea soup with meatballs. The soup is named after the city of Adana which is located in the Southern part of Turkey. It's the fifth populous city in Turkey. Adana is a major agricultural, industry and commercial center. So far about geography. Now to cooking ...

Ingredients:
300 g chickpeas
1,5 l beef stock
200 g minced beef
A small bunch of parsley, chopped up
2 tomatoes, cut into smaller pieces
Cayenne pepper
Salt and pepper
White wine vinegar 

Method:
The first thing to do is to cook the chickpeas in the stock until they are soft.
In the meantime mix the minced beef together with the parsley a pinch of salt, pepper and cayenne pepper and make small meatballs out of it.
When the chickpeas are ready, add the meatballs and the tomatoes to the pot and cook for further 15 minutes. Feel free to adjust the seasoning with salt and pepper.


Well, it's already time to eat. Serve on plates or bowls as you like it and finish off each portion with a splash of white wine vinegar.


So, here we go with my contribution to Bloggers Around the World: Turkey. It feels a little bit lazy, but ... hey ... who cares. The soup tasted fine and ... everything's fine.


Are you ready for May then? Bring it on then, it will be as good as the ones before ...

Wednesday, 16 April 2014

Warning: Extremely Delicious Vegetable Lasagne


Ha, you weren't expecting this. You thought this crazy guy would give you another one from his loose bottomed tart tin. Nope! Instead I give you something from the bottom of my heart and i hope you will love it too. Today I have a vegetable lasagne for you. 
Simple? Yes, but be warned, in my opinion this vegetable lasagne tastes extremely delicious. Of course, I have to say this, but there is only one way to prove me wrong. You would have to try it for yourself. Besides that, you will also find some ... eh ... what to call them ... eh ... let's try ... twists and an unexpected ingredient.
Less talking more cooking ...

Ingredients:
6 lasagne sheets
1 medium aubergine
2 small courgettes
A few splashes of olive oil
1 large tomato
1 clove of garlic
2 tbsp. tomato puree
100 ml water
50 ml red wine vinegar
A few basil leaves
Salt and pepper
200 ml crème fraîche
1 egg
A hand full of grated parmesan
3 tbsp. grated radish

Method:
The times I made a vegetable lasagne before, was to cook all the vegetables into a kind of sauce. However, we are not doing this today. We like to preserve the pure individual tastes of the single vegetables ... at least most of them. I was inspired to do it in a different way by watching an episode of MasterChef Australia.
Therefore we cut the aubergine and the courgettes in a way they fit to the lasagne sheets, that is they are going to be cut into fine slices. Then get a baking tray ready with some grease proof paper and heat up your oven to 180 ÂºC.
Be generous with salt to the sliced vegetables. Off into the oven they go for about 15-20 minutes. Just make sure, they don't get burned.
Meanwhile get your tomato sauce ready. Get a pan ready on heat. Be generous again. This time with olive oil in the pan. The ancient principle 'those who give bountifully, will receive bountifully' still applies.
Cut the tomato in small chunks and throw them into the hot oil to let them sizzle away. Finely chop your clove of garlic and toss it into the oil as well. When you start to smell the beautiful odour of the garlic on your kitchen add the tomato puree, the water and the red wine vinegar. Go through the sauce with a spoon and adjust the seasoning with salt and pepper. On a low heat reduce the sauce for a while. When the sauce is thick enough and you are almost finished use the basil leaves to finish off the sauce.
Before we can start putting the lasagne together we have two more jobs to do. The fist one is to pre-cook the lasagne sheets in boiling salted water for about three minutes. The second job is to prepare some kind of white sauce to put between the layers.
For this white sauce we simply ... yes, very simply ... spoon together, the crème fraîche, the egg, the parmesan and the grated radish. Well, I suppose you could use horseradish, too. 
Anyway, I used to have radish when I was way younger and then ... didn't have it for a long time. Due to the fact, that radish is in season right now, I thought I give it a go again. For sure I had something in mind for it, but I just ended up eating most of it raw. So far I never had used radish in cooking. Bravely I decided to grate some of it into my white sauce for my vegetable lasagne. Well, it worked ... well.
After this brief detour into my use of radish we get back to our lasagne. We are almost there.
Now get yourself a 20 cm x 20 cm oven-proof dish. Remember that the oven is still at 180 ÂºC. We start the lasagne with a splash of olive oil that you rub onto the bottom of your dish. Then a few slices of aubergine follow, two sheets of lasagne, white sauce, courgette, white sauce, lasagne sheet, aubergine courgette, white sauce, lasagne sheets and white sauce.
Well it all depends on the amount of sliced vegetables you have. Feel free to change things a tiny little bit. Just make sure, you have three layers of lasgane sheets.
Before the vegetable lasagne goes into the oven, grate some extra parmesan on top and while you are at it allow some olive oil to be drizzled on it, too.
The lasagne should go into the oven for about 15-20 minutes. It may look like this afterwards ...


You see, there is a bit of colour on it. If you want more, you have to give more. This vegetable lasagne will make for four humble portions, but be warned ... I said it before ... it tastes extremely delicious. So you might want to plan ahead for this.
Whatsoever. serve the lasagne with a few spoons of the tomato sauce on top.


You know, if you add more sauce there is more of it to enjoy and it will all drip onto your plate and you might want to do something with the plate later.
In my opinion, this vegetable lasagne was the best I had so far. You can still taste the aubergine and the courgette individual and you have a gorgeous tomato sauce, too.


I can only recommend to try it for yourself. I might be wrong here, but ... you'll never know if you don't go for it.

Speaking of going for it, this post will go to some blog challenges in no particular order ...

Elizabeth's No Waste Food challenge hosted by Ness at Jibber Jabber UK this month. Fine, I would never have thrown the remaining radish away, but here I used the left over radish in a delicious way.


Javelin Warrior's Made with Love Mondays. Check it out for yourself!

JWsMadeWLuvMondays

Helen's and Michelle's Extra Veg Blog Challenge. If I haven't used some extra veg here, I don't know and then again, I used the radish as I have never used it before.

Extra Veg Badge-003

Camilla's Credit Crunch Munch. Having a vegetarian meal with vegetables either on offer or in season or both will help you to save some money.

Credit Crunch Munch

Manjiri's and Jacqueline's Pasta Please challenge. The theme for April is Olive Oil. No, I wasn't especially generous with it because of this challenge. I just wanted to and found it necessary for the sauce to work properly.

pasta please

The Four Seasons Food April Challenge from Delicieux and Eat Your Veg. The goal was to celebrate vegetables. In my opinion ... again ... this is what this very vegetable lasagne is doing.


Then we have the Simple and in Season challenge from Ren. Do I have to say it again that radish is in season?

Simple and in Season NOW OPEN

Just because I can, I add this post to Recipe of the Week from Emily, too.

Link up your recipe of the week

Last but not least we have Karen's Cooking with Herbs challenge. Guess why?

Cooking with Herbs Challenge for April

Tuesday, 18 March 2014

Still Italian - Saltimbocca alla Romana with Roasted Vegs

I am still in the mood for Italy or was it Italian food? I would right away do a food trip to Italy, if I could. However, as there is no room for thinking about that at the moment I have some more Italian food: Saltimbocca. It may be strangely, but that was something popping into my mind when thinking further about Italian food. I wanted to make it for some time now. The only problem so far was, to come across some nice veal escalopes.
A few days then, it was the case, so I started searching for some ideas and found something from the Jamie Oliver magazine: Saltimbocca alla Romana.


That sounded perfectly good for me ... eh ... almost good for me. I just made a tiny bit of adjustment.
First of all, I concentrated on what to have with my saltimbocca. The original idea was to have some rosemary potatoes. Instead I went for a bit more colour. So, feel free to use any kind of vegetables you love to have or want to use up.
I used potato, courgette, carrot and celery. I simple chopped up the vegetables in different shapes, seasoned them with some dried rosemary and salt and dripped enough olive oil on top of them.


Because that wasn't good enough for me, I tossed in some whole garlic cloves, which to squeeze over the vegs after roasting them for about 30 minutes at 200 °C in the oven.

Just before the roasted vegetables are ready, you can prepare the saltimbocca.

Ingredients (for 1 person):
1 veal escalope (about 100 g)
Black pepper
Some sage leaves
2 slices of Parma ham
A splash of olive oil
2 knobs of butter
A splash of sweet white wine

Method:
I started my saltimbocca with flattening it out. Sometimes I need to make some noise, so the neighbours know I am still alive.


Then I went on seasoning the meat with some black pepper. After that I placed a few of the tiny sage leaves I still had left from the bunch of sage I had bought a few weeks ago.
Just a few stems had survived them. I had put them in a glass with some water. One of the stems had developed some roots now. So I planted that one into a pot and used the leaves from the other stem.
Over the sage leaves then, the two slices of Parma ham were placed.


Time to heat up the pan with some olive oil and a knob of butter. From here on, things go quite fast. The saltimbocca needs two minutes on each side. Then you remove it from the pan, cover it with aluminium foil and leave it to rest until you are finished with the sauce.
In order to do that, you add another knob of butter and a splash of sweet white wine to the pan you have still on the heat. Add some more sage leaves to the pan and quickly reduce the sauce, because I am hungry.


Plate up the Saltimbocca alla Romana with some of the roasted vegetables and enjoy a very delicious meal. Now I remember, why I always wanted to make saltimbocca, because it tastes so great - that is, if you have used good quality ingredients.

Before I come to end here I like to add this post to some challenges.
First of all to Javelin Warrior's Made with Love Mondays. I didn't see anything wrong in the ingredients I used. It's all from scratch here.

JWsMadeWLuvMondays

The herbs in that dish are obvious. You can even see them on the photos, the rosemary and the sage. So I even used herbs according to this month's Cooking with Herbs, which is managed by Karen from Lavender & Lovage.

March Challenge for Cooking with Herbs

Now it's just time to continue thinking of Italy. I don't know whether reading Romeo & Juliet will help ... or some Italian wine is necessary ... who knows!?