Showing posts with label basil. Show all posts

Thursday, 6 July 2017

No Need to Argue - Braided Herb and Cheese Bread

If there is one thing this blog and my blog posts are known for, it's the ridiculous thoughts I have time  and again. However, you shouldn't take everything I said so serious. That would just be a disappointment. You know, I am not twenty one anymore and I am not so sure, whether I could or should be dreaming my dreams. Whatever the case, this blog will never be empty or devoid of food and I hope I will not be changing into a food writing zombie (whatever that is). Don't be so sad, though, if I can't be with you all the time. Right now, I am having a good time, it's summer, the sun is shinning and if I look outside it's not the time to watch while the icicle melts.
By now you should have found out, that there really is no need to argue. Nevertheless, I have no idea nor plan how ever I could use the terms Yeats's grave and daffodil lament in any causal sentence here during this blog post, even if I would include an ode to my family.
While I like writing song based blog posts, I would like to dedicate this one to The Cranberries studio album No Need to Argue. But why is there no need to argue? I like to be frank with you. I love carbs, gluten, wheat, yeast, bacon and all that stuff. While I have no problems with others eating gluten free or low carb, you don't need to argue with me about these things, I just love my dough.
For that I have some bread for you with all the lovely things.


Fine, go ahead, start arguing about the quality of the photos. Well, sometimes things are good and sometimes they are not

Ingredients
300 ml tepid water
7 g yeast
tsp honey
300 g flour
200 g semolina
salt
basil, sage, mint, rosemary
200 g mozzarella, grated
125 bacon, cubed
pepper

Method
We start with the tepid water in one bowl or measuring jar, as I usually do. We add the yeast and the teaspoon of honey. Let the yeast do its magic. Meanwhile get a larger bowl for the flour, semolina and a pinch of salt.
Then it's time to mix the yeasty water with the flour and get things together for a dough.


Get your share of food fitness by kneading the dough for a while to release the glutens (here we go). At the same time you fry of the bacon cubes for a while to give them some extra colour and all that you want.
Chop up the desired amount of the above mentioned herbs, chop them really finely. Then you can work them into the dough. Yes more kneading. After that you get 100 g of the mozzarella cheese and knead it into the dough as well. Follows the bacon and even more kneading until you have all the goodies evenly in your dough.
I reckon, it's time for the dough to do its thing and rise. Meanwhile you can ... no need to argue .. do whatever you like. Maybe you could watch an episode of your favourite series. While we are talking about it ... nah ... whatever.
Just get it over with. I suggest one hour. Then separate the dough into three even balls.


Get a baking tray with some baking parchment ready. You might want to heat up the oven to 200 °C.
Turn the three balls of dough into ... eh ... three sausages of dough, just a little longer then your baking tray. After that we can go for the fun part, braiding the bread. In my opinion, with hair this braiding is a bit easier and ... if you really have to ... but then again no need to argue ... if you look at the fotos the braiding didn't work that out that pro on my bread, but this in no way diminished the taste.
Once the braiding is finished ... for good or for bad ... spread over the remaining cheese and add some pepper on top and transfer the baking tray to the oven for 20 - 30 minutes. The bread is looking golden brown and ready for ...


... the time to enjoy. For sure you will find a good way to do so. You will find something lovely to eat on the side.


That whole thing might be a bit dangerous for me as I could go ahead and finish off that bread just that. No need to argue!

Monday, 1 May 2017

Dinner with Bills

Here we go with another part in the bill-series before the month of May comes to its end. It was long due anyway. While I have had at least one more dinner dish from Bills Sydney Food before I already wrote about it under different circumstances. There was for example the dish: Prawn and Chilli Linguine …


Well, if you follow the link, of course you find the old post. However, we like to go on with something more current, although it is pasta again.
The dish is called Fresh Tomato Pasta. The aim was to get as much taste out of the tomatoes as possible. So best it would be to have as best tomatoes as you can get.

There is not much fuss about it. Apart from the tomatoes and the pasta, you have just some sea salt, olive oil, red wine vinegar, juice and zest of a lemon, red chilli, black pepper and some basil leaves. It tasted fresh indeed.

For sure I will make that one again … well, I have all the ingredients at home most of the time, although the tomatoes could be a bit better, since they are not in full swing yet.
The other dinner dish I tried is not for the main course, but rather for pudding: Pavlova. I will not start this background discussion regarding the origin of pavlova again. After all, that is not what this is about.

Well, that looks already lovely and … was not that difficult to accomplish. However, it still has to go into the oven. The challenge is to have it over one hour in the oven at 120 °C, get it firm on the outside and don’t let it brown. Hm, eh, well, judge for yourself …

That was the best I could do. Maybe you can notice the colour difference in comparison with the whipped cream. Whatever the case, it tasted delicious with the pulp of the passionfruit.
Now that was the dinner part I tried so far, now I could start again with breakfast thing. Besides that, I should get cooking again.
If I remember it right, I kind of challenged myself to try as many recipes from Bills Sydney Food as possible. Eh, that doesn’t sound like a challenge at all. Ah, no worries, I don’t need a challenge, it’s just about having a bit of fun …

Wednesday, 19 April 2017

Chicken Macaroni Cheese Apokalypse

Yes, you also know it doesn’t look that good, is not too healthy, will have too much calories and … but you want it, because it brings you comfort and tastes yummy.
We all know such dishes.
Today – using some leftovers from the indecent looking chicken (sorry, if there were any disturbing or offensive images in my last post) – I’ll bring you my Chicken Macaroni Cheese Apocalypse …

So, what do you associate with ‘Apocalypse’? Death and destruction?
Wrong!
If you know your Greek, you’d say ‘revelation’, for that is what the Greek work apocalypses means. So … the question now is, will this Chicken Macaroni Cheese be a revelation?
Let us see! For sure it will be very different from what you had before. Hm … yes … eh … well, different.
You know, you want it!
Come and get it!
Ingredients:
200 g cooked chicken meat, shredded (yes, I used it from the beer butt thingy)
200 ml cream (I would have used double had I any)
200 g grated cheese (sadly I just had 100 g)
100 g bacon (cubes, stripes, whatever you fancy … it’s your life)
50 ml chilli sauce (anyone you like)
50 ml tomato puree
2 cloves of garlic, finely chopped
Some basil leaves, torn
Salt and pepper (because we want it)
250 g macaroni
Method:
Go, get your macaroni boiling. Pre-heat the oven to 180 °C.
Grab yourself a proper ovenproof dish (20 x 20 cm did for me) and go for it. Now that will all sound a bit simple from here on … because it is: Throw the ingredients into your ovenproof dish!
While the macaroni might not be ready yet, your dish might look like this …

With all that bringing your water for the macaroni to oil, even though using a kettle to help you, up to here things are fast and you really have to wait for the macaroni.
No worries, though, once the water is ready, the macaroni will be in under 10 minutes. Rinse and add …

That looks like, it could go to the oven and so it does …
By that time I already knew, I didn’t have a sufficient amount of cheese in it. Another remedy would have been to add a ball of mozzarella, but … I didn’t. Just saying!
Oh, yes, 20 minutes in the oven had to do for me, but I reckon 30 minutes will also do no harm.
At this point, things will look like this …

Yes, I know, it doesn’t look spectacular and it’s not much worse adding this picture at all. Hey, you know what? I do it anyway, because I’m the boss here. No I don’t have any issues in connection with being or not being the boss. I have other issues, but I try to suppress them for as log as possible, at least until I am finished here. You really don’t want to read any about it.
You know, you want something else. So let’s get on with it. What about putting on a bit of garnish?

That should do. I asked an expert about it, although she didn’t knew, what I would be using it for. A little bit of basil can go a long way. In our case it goes here …

Well, fine, you can also place it on the individual serving as I did in the opening. If you can’t resist, you can also drizzle over some extra virgin olive oil over it. Just saying! It’s your life!
Now, is that a revelation or just death and destruction?
Think about it! Answer correctly, if you want to live! It’s your life!
Scared? Sorry, I just have to work on making proper threats, but you know that I know how to find you … ah, just kidding, I wouldn’t really tell or show what I am capable of.
Fine, that’s enough. I better get out of here before things get out of hand. See ya!

Sunday, 16 April 2017

#Foodfitness with Beef and Cheese Empanadillas

It is about time I start putting up some more food here on our blog. It has been quite a while of inactivity, which doesn't mean I haven't been active. In fact I have been very active and I have been doing quite some exercise, enjoying it together with my beautiful wife. Life is really good!
Now, though, it is time again for some other kind of exercise again ... food fitness.
Let's have some Spanish food today, which you could also use for a picnic, if the weather so permits.


Ingredients:
450 g flour
1 tsp. baking powder
1 tbsp. butter
1 egg
1 tsp. honey
pinch of salt
lukewarm water
1 onion (finely chopped)
some chillies (to your liking, finely chopped)
2 cloves of garlic (finely chopped)
500 g minced beef
smoked paprika
salt, pepper
2 tbsp. tomato puree
basil, rosemary, mint
3 spring onions (chopped in rings)
150 g grated cheese (whatever kind you fancy)
30 g sultanas
oil for frying

Method:
First of all we go for the dough, setting the tone for the whole thing, putting some energy in the preparation, for there will be much energy in the consumption as well, although I am not quite sure whether you want to hear it.
Put the flour with the baking powder in a bowl, rub in the butter. Then add the salt, honey and egg. Knead the dough in a fitness-like fashion adding as much of lukewarm water as it needs to bring the whole dough together.
Then let the dough rest for at least 30 minutes. In case you also need that rest, I guess you have to give it some more time. Otherwise you can you the time wisely to already prepare the filling.
You start off with the onions in a large pan, let the chillies and the garlic join. After the onions are translucent you can put in the meat and season it with salt, pepper and the smoked paprika. Once the meat has gained sufficient colour you can add the tomato puree and go on frying as long until it is all relatively dry. We don't want the filling too wet to cause any problems.
Just when it is all ready that far, turn off the heat and add the basil, rosemary, mint, spring onions, cheese and sultanas. It might look a little bit like this ...


You have some time for it to cool off a bit. That will be the time to prepare the individual empanadillas and have some extra exercise. If you still feel you need more exercise, do some push-ups, squats or crunches later on, but here we go with good old food fitness ...


Try to make it thin. This way you will enjoy the filling much later when all is finished. Give it your all. You want to feel those muscles in yours so you can actually say you have done some real exercise. Get some round shapes out of the dough for the final empanadillas. We got a special tool for it here so it will work out perfectly with the shape and sticking in the filling.
Give every circle of dough, we had 15 in the end, a teaspoon of filling or a little bit more, as your conscience permits and as you will be able to seal them properly afterwards. We don't want any filling to exit while frying. We only want to let the filling exit in your mouth while eating.


If it looks like this you might be doing it right. To ensure they are securely shut, you can use a fork to seal them well.
Then enjoy the time for frying the empanadillas in sufficient oil and hopefully they are securely shut. I didn't do it so well, when I tried it the other week, but this batch went perfectly well without incidents ... for my wife was helping to make it happen just fine.


Now the only thing that remains is enjoy your empanadillas with some salad and a beer ... any kind of beer. It doesn't need to be Spanish, although I wouldn't mind a bottle of Estrella de Galicia.
We hope you had enough exercise preparing the empanadillas. As for my part I feel like I still have to do some more exercise. These days I am kind of crazy about doing some exercise. That's not bad, after all the body feels a lot better when it is filled with muscles and not with ... anyway, I don't want to suggest anything here, but just that I am always going to enjoy some good food exercise, when it also leads to some tasty results. It would really make me feel bad, if I would put in all the effort in preparing  and eating if it wouldn't be worth it. 
In this very case here of the empanadillas we can assure you that it was absolutely worth it and we are going to enjoy it any time.
We hope you are having a good time and are keeping healthy!

Saturday, 15 April 2017

Breakfast with bills

I really don’t know how I ended up with the great obsession with Australia. Honestly, I don’t know, but just because I have it I bought this cookbook by Bill Granger some time ago.

It features recipes from Bill’s cafe in Darlinghurst. Well, I had never heard about it before. That also means consequently, I had never been there myself. You, know, it’s just that Australia obsession again.
The book says on the back cover: “The only bills cookbook you’ll ever need.” Well, I’m not so sure whether this is a good strategy. How are they ever supposed to do a Bills Sydney Food 2? Then maybe, they never wanted to anyway.
Again, I don’t know. What I am sure about is, I had plans to go to that place myself, once I get to Sydney. In fact that is what I did ... and I also enjoyed it very much.
Just before that, I wanted to make sure, I tried as many recipes from the book as time, motivation, health(?) and ingredients permit.
For sure it will bring some great variations in the breakfast, lunch and dinner department, especially the breakfast department, which is usually quite limited … cereals or a few slices of bread. That doesn’t have to be like that.
Along that line I tried a few recipes from the book …

That’s an Open-faced omelette with fresh tomato, emmenthal and rocket. So, it wouldn’t be too hard, to put that up once in a while for breakfast.
Next we have …

… we have Banana maple porridge with buttere apples. Delicious, although I didn’t manage to make it look so good on the photo. Maybe I should have used a similar perspective as in the book.
Finally, for today I have tried this one …

… Pan-toasted sandwich with tomato & fontina. That was my favourite one so far. Honestly, I didn’t use fontina cheese in this one, but another creamy and tasty one. In fact, the lady at the cheese counter couldn’t even make something of the name Fontina.
Well, that’s the way it is.
If you want to have this for breakfast, though, you have to get up early. The recipe says, you have to mix 100 ml olive oil, 4 chopped cloves of garlic, 1 chopped red chilli, salt and pepper together and then marinate slices of tomatoes for two hours in it. So you have to get up ahead … or have someone else do it for you. Sorry, I had no chance for that.
After that time, you brush one side of the bread slices with some of the oil from the tomatoes, put slices of cheese on that. Then come basil leaves, the tomatoes and another slice of bread.
Now you only have to melt butter in a pan and … of course … toast the bread in it. Why else would you call it pan-toasted sandwiches.
Finally you can eat the hot sandwiches.

Those don’t look too different than in the book. There only the cheese oozes a bit more. Maybe because it is fontina? Or maybe due to other unknown reasons? Whatever, no worries.
I reckon, the stage is set. Roughly, you have an idea of what still is to come. 
If you liked this post, keep on the lookout for more breakfast with bills or even lunch or dinner with bills.
Hm … what is this … I smell … baked goods, I smell coconut … I catch you later then …

Wednesday, 16 April 2014

Warning: Extremely Delicious Vegetable Lasagne


Ha, you weren't expecting this. You thought this crazy guy would give you another one from his loose bottomed tart tin. Nope! Instead I give you something from the bottom of my heart and i hope you will love it too. Today I have a vegetable lasagne for you. 
Simple? Yes, but be warned, in my opinion this vegetable lasagne tastes extremely delicious. Of course, I have to say this, but there is only one way to prove me wrong. You would have to try it for yourself. Besides that, you will also find some ... eh ... what to call them ... eh ... let's try ... twists and an unexpected ingredient.
Less talking more cooking ...

Ingredients:
6 lasagne sheets
1 medium aubergine
2 small courgettes
A few splashes of olive oil
1 large tomato
1 clove of garlic
2 tbsp. tomato puree
100 ml water
50 ml red wine vinegar
A few basil leaves
Salt and pepper
200 ml crème fraîche
1 egg
A hand full of grated parmesan
3 tbsp. grated radish

Method:
The times I made a vegetable lasagne before, was to cook all the vegetables into a kind of sauce. However, we are not doing this today. We like to preserve the pure individual tastes of the single vegetables ... at least most of them. I was inspired to do it in a different way by watching an episode of MasterChef Australia.
Therefore we cut the aubergine and the courgettes in a way they fit to the lasagne sheets, that is they are going to be cut into fine slices. Then get a baking tray ready with some grease proof paper and heat up your oven to 180 ºC.
Be generous with salt to the sliced vegetables. Off into the oven they go for about 15-20 minutes. Just make sure, they don't get burned.
Meanwhile get your tomato sauce ready. Get a pan ready on heat. Be generous again. This time with olive oil in the pan. The ancient principle 'those who give bountifully, will receive bountifully' still applies.
Cut the tomato in small chunks and throw them into the hot oil to let them sizzle away. Finely chop your clove of garlic and toss it into the oil as well. When you start to smell the beautiful odour of the garlic on your kitchen add the tomato puree, the water and the red wine vinegar. Go through the sauce with a spoon and adjust the seasoning with salt and pepper. On a low heat reduce the sauce for a while. When the sauce is thick enough and you are almost finished use the basil leaves to finish off the sauce.
Before we can start putting the lasagne together we have two more jobs to do. The fist one is to pre-cook the lasagne sheets in boiling salted water for about three minutes. The second job is to prepare some kind of white sauce to put between the layers.
For this white sauce we simply ... yes, very simply ... spoon together, the crème fraîche, the egg, the parmesan and the grated radish. Well, I suppose you could use horseradish, too. 
Anyway, I used to have radish when I was way younger and then ... didn't have it for a long time. Due to the fact, that radish is in season right now, I thought I give it a go again. For sure I had something in mind for it, but I just ended up eating most of it raw. So far I never had used radish in cooking. Bravely I decided to grate some of it into my white sauce for my vegetable lasagne. Well, it worked ... well.
After this brief detour into my use of radish we get back to our lasagne. We are almost there.
Now get yourself a 20 cm x 20 cm oven-proof dish. Remember that the oven is still at 180 ºC. We start the lasagne with a splash of olive oil that you rub onto the bottom of your dish. Then a few slices of aubergine follow, two sheets of lasagne, white sauce, courgette, white sauce, lasagne sheet, aubergine courgette, white sauce, lasagne sheets and white sauce.
Well it all depends on the amount of sliced vegetables you have. Feel free to change things a tiny little bit. Just make sure, you have three layers of lasgane sheets.
Before the vegetable lasagne goes into the oven, grate some extra parmesan on top and while you are at it allow some olive oil to be drizzled on it, too.
The lasagne should go into the oven for about 15-20 minutes. It may look like this afterwards ...


You see, there is a bit of colour on it. If you want more, you have to give more. This vegetable lasagne will make for four humble portions, but be warned ... I said it before ... it tastes extremely delicious. So you might want to plan ahead for this.
Whatsoever. serve the lasagne with a few spoons of the tomato sauce on top.


You know, if you add more sauce there is more of it to enjoy and it will all drip onto your plate and you might want to do something with the plate later.
In my opinion, this vegetable lasagne was the best I had so far. You can still taste the aubergine and the courgette individual and you have a gorgeous tomato sauce, too.


I can only recommend to try it for yourself. I might be wrong here, but ... you'll never know if you don't go for it.

Speaking of going for it, this post will go to some blog challenges in no particular order ...

Elizabeth's No Waste Food challenge hosted by Ness at Jibber Jabber UK this month. Fine, I would never have thrown the remaining radish away, but here I used the left over radish in a delicious way.


Javelin Warrior's Made with Love Mondays. Check it out for yourself!

JWsMadeWLuvMondays

Helen's and Michelle's Extra Veg Blog Challenge. If I haven't used some extra veg here, I don't know and then again, I used the radish as I have never used it before.

Extra Veg Badge-003

Camilla's Credit Crunch Munch. Having a vegetarian meal with vegetables either on offer or in season or both will help you to save some money.

Credit Crunch Munch

Manjiri's and Jacqueline's Pasta Please challenge. The theme for April is Olive Oil. No, I wasn't especially generous with it because of this challenge. I just wanted to and found it necessary for the sauce to work properly.

pasta please

The Four Seasons Food April Challenge from Delicieux and Eat Your Veg. The goal was to celebrate vegetables. In my opinion ... again ... this is what this very vegetable lasagne is doing.


Then we have the Simple and in Season challenge from Ren. Do I have to say it again that radish is in season?

Simple and in Season NOW OPEN

Just because I can, I add this post to Recipe of the Week from Emily, too.

Link up your recipe of the week

Last but not least we have Karen's Cooking with Herbs challenge. Guess why?

Cooking with Herbs Challenge for April

Monday, 7 April 2014

Basil and Lemon Frangipane Tart


Finally I managed to buy a loose bottom tart tin. I was looking for it every ... I went to and thought they might have one. Now I managed. Therefore I can go for it and bake madly as ... eh ... I want to.
The first thing on my list of things I wanted to bake was a frangipane tart. This almond filling taste so gorgeous, at least in my mind. Here we go then. Over enthusiastically as I am at times I had stocked myself with lemons that I didn't actually have a plan for. Apart from that there was some basil growing on the windowsill, which wasn't too sure about whether to die or still live on happy ever after ... or rather until dying a natural basil's death of being used up in cooking.
To cut a long story short, before I go overboard here, the Basil and Lemon Frangipane Tart was about to rise from the ashes of the basil ... no, the basil wasn't that bad, in fact it wasn't looking bad at all, but that could have changed any day now, kind of unstable that herb is.
Anyway, top talking, start baking ... Basil and Lemon Frangipane Tart.

Ingredients:
For the pastry:
150 g butter
100 g sugar
Pinch of salt
250 g flour
Zest of 1 lemon
Handful of chopped up basil leaves (use more, if you need more basil in your life)
1 egg
For the frangipane filling:
1 egg
100 g ground almonds
100 g butter
90 g sugar
Juice of one lemon (how would that lemon have looked otherwise)
1 tbsp. vanilla extract
100 g icing sugar
Apart from that:
100 g raspberry jam
Icing sugar
Melted chocolate

Method:
We like to start with the pastry for the Basil and Lemon Frangipane Tart. First of all we cream the butter and the sugar so that you don't see any loose sugar grains anymore, but instead everything should have been assimilated by the butter. While you are at it sneak the salt in, too.
Next goes in the flour. Sometimes I like to massage it in until the mixture looks like breadcrumbs. At other days I simply go for it and add the remaining ingredients as well. In this case, the lemon zest, basil and the egg.
Carefully bring all the ingredients together into a fine lump of dough. Wrap it into clingfilm and place it in the fridge for at least 30 minutes.
After that it's time to get your loose bottom tart tin (I love it now) ready. Rub some butter all over the tin and push the dough into the tin. Well, you could roll out the dough first and then go for it. The good thing with this kind of pastry is, you can still push it everywhere you want, even if the rolled out dough tears.
Whatever, that same pastry now needs some serious blind baking for about 15 minutes at 180 ºC.
Meanwhile, we can make the frangipane filling. Honestly, I don't want to make any fuss about it. Get a sufficiently sized bowl and mix all the ingredients for the frangipane filling thoroughly.
The 15 minutes of the blind baking should be over at one point ... about 15 minutes after they started, I reckon, unless you prove me wrong here.
Here a little picture, I tried to put together, showing the different steps of the tart until the product is finished.


To follow those steps, spread the raspberry jam on the blind baked pastry and after that try to top it with the frangipane filling. At least that was the idea originally. During that process the jam and the frangipane filling rather might mix a bit. No worries, though, it's part of the package.
Having now an empty bowl, where the frangipane filling used to be and a filled pastry case, I'd say it's a rather good time to put the tart into the oven, which is now at 190 ºC.
Further 18 minutes will bake things right.
Sadly, as some might see it, you have to cool down the Basil and Lemon Frangipane Tart.
At this point it doesn't look too gorgeous as would everyone agree on, I suppose.
Have some icing sugar on it. Oh, that's better, but ... we can do even better. We need something that'll always do: CHOCOLATE. No, not that much, just sprinkle a few fine lines on top of the tart ... blob. Great, no fine lines! We can attempt a few fine lines and put here and there some occasional blobs to make it appear to the beholder it was on purpose. Said and done ...


... I am rather pleased with the outcome. While being at it, I just simulated the case I would have a guest for tea time enjoying this delicious tart together with me. I even put on a candle. At other times it might give the impression of being romantic, but ...
I simply wanted a yummy frangipane tart. 
Now have a closer look at the tart in the next picture and have a guess of what it reminded my malfunctioning brain! 


Anyway, the taste of the frangipane tart was so temptingly dangerously good I even could here the tart calling from the kitchen: "Come and get me, get another slice ...!" Great!
Then it wasn't even a shame that it didn't taste that much of basil. You get more taste from the raspberry jam and the frangipane filling. However, there is a slight hint of basil. Therefore, if you have the feeling, there hasn't been enough basil in your life, feel free to increase the amount until the dough has the colour of your lawn, reminds you of Ireland or until you are well pleased with it.


Things were fine with me. Right, apart from the fact of what I had to do with the tart in the course of days that followed ... it wasn't my fault, was it? Yes,I could have, but I didn't.
However, have an even closer look and tell me ... right to my face ... how you could possibly resist a piece of that tart. 


So, once more, totally heart-broken and shattered I have to admit, it was all my fault entirely, for who has created this Basil and Lemon Frangipane Tart ...

While still being in grief ...over various things, I can't change now anymore anyway, I like to move on and submit this Basil and Lemon Frangipane Tart to a cleverly devised selection of blog challenges, due to various reasons ...

Let's do it in alphabetical order then. I might not have used mint in this tart, although I could have, based on the behaviour of the mint on my windowsill, but I didn't want to have an ill-behaved Mint and Lemon Frangipane Tart. Karen from Lavender and Lovage said, it would be alright, if I use any kind of herb to join the Cooking with Herbs challenge, which I from the bottom of my heart want to do.


Cooking with Herbs Lavender and Lovage

That brings us already to the letter 'M' and Javelin Warrior's Made with Love Mondays. Just to make sure you can use homemade quick raspberry jam with raspberries and sugar, but since I couldn't get that many raspberries I had to go with the nearly as good as homemade raspberry jam to have a from scratch recipe for the Made with Love Mondays.

JWsMadeWLuvMondays

Then I like to talk again about the lemon and the basil. I didn't want any of those two go to waste, that is let them die before I get the chance to use them. Therefore, I like to add this to the No Waste Food Challenge, which is brought to us by Elizabeth from Elizabeth's Kitchen Diary. However, this month, the challenge is hosted by Ness from Jibber Jabber UK.


So, if you want to count in, that I ate the whole cake as well to the not wasting food, then ... oops. Now it's out!

Quickly, on with the fourth and final challenge. We go back to Karen, although it is a joined challenge by Lavender and Lovage and The Hedgecombers. However, this month it's Karen's turn and the chosen theme is: Jams, Curds and Preserves. Hopefully, at this point you don't have to guess for too long which of the three I used in my recipe.


Tea Time Treats Lavender and Lovage

Having reached this point of the post, I wish to say thank you to all those, who have continued reading this far into the post. You are wonderful people, thank you for being out there!!! Really, I mean it, it's not just a phrase. I hope to see you again. You can bring friends, too.

Now I have some work to do. Whatever that may be ...

Saturday, 15 March 2014

Chain Reaction: Italian Week - Tomato Sauce, Pizza and Lasagne

Sometimes one thing leads to another. I like to have some kind of cooking chain reaction, when the leftovers of a meal come to star in another meal or two or even more. I dreamt of five meals or so. Well, I will be satisfied with less ... for now.
It all started with a tomato sauce. No, not exactly, it started when I found some lovely celery sticks and carrots smiling at me. When celery and carrots smile at a man, the only thing you can do is smile back and ... cook with them.

Meal 1: Pasta with Tomato Sauce (call it vegetarian bolognese, if you like)

Before I go on, I just want to tell you, I couldn't find the photos of the pasta with tomato sauce. Maybe that's because I didn't take any.

I put a large pan with olive oil on medium heat. Then I went about finely chopping two cloves of garlic, an onion, four celery sticks and two large carrots. All the tiny bits of vegetable ... eh, maybe I didn't chop them that fine ... went into the pan in order to be soften. Have patience and enjoy the process.
Next I poured a tin of tomatoes (400 ml) into the pan with some extra water. I better should ave taken two tins or a larger one. That's why I added some fresh tomatoes and a bit of tomato puree later on. Oh, some chopped up red chillies will give the sauce some extra heat, too.
It's important not to forget the seasoning. Good I didn't forget it the same way I forgot the photos and (you will see later) something else.
Anyway, now you want to get the content of the pan boiling and then leave it simmering for 30 minutes.
At this point you check the seasoning again. Better safe than sorry.
Now a splash of red wine vinegar comes in handy and ... you have to make a decision. You could just break up the tomatoes with a spoon or put the whole sauce into a blender and ... let things go. I went with blender. I wasn't in the mood for coarse consistency this time.
Finally I added some chopped up fresh basil.
Cook your pasta according to the package instructions, if you are not doing fresh pasta.
Again, if you don't forget, you could catch up some of the cooking water to add to the sauce.
Whatever the case, have a plate of pasta with the tomato sauce and some parmesan on top. It won't disappoint you.

Of course we have some leftover tomato sauce in order to continue ...

Meal 2: Four-cheese Pizza

I had to do this. It was about time I do a post with pizza again. You can never have too much.
I want some tomato sauce for my pizza before I put the final topping on, no matter what it is. At least that is what I think right now. Well, I can't remember it otherwise right now, I forgot it (with all this forgetting, I reckon I am getting old).


Fine, we already have our tomato sauce for the pizza. What else? Of course, the pizza dough. You can use your favourite pizza dough or have a look here for a recipe.
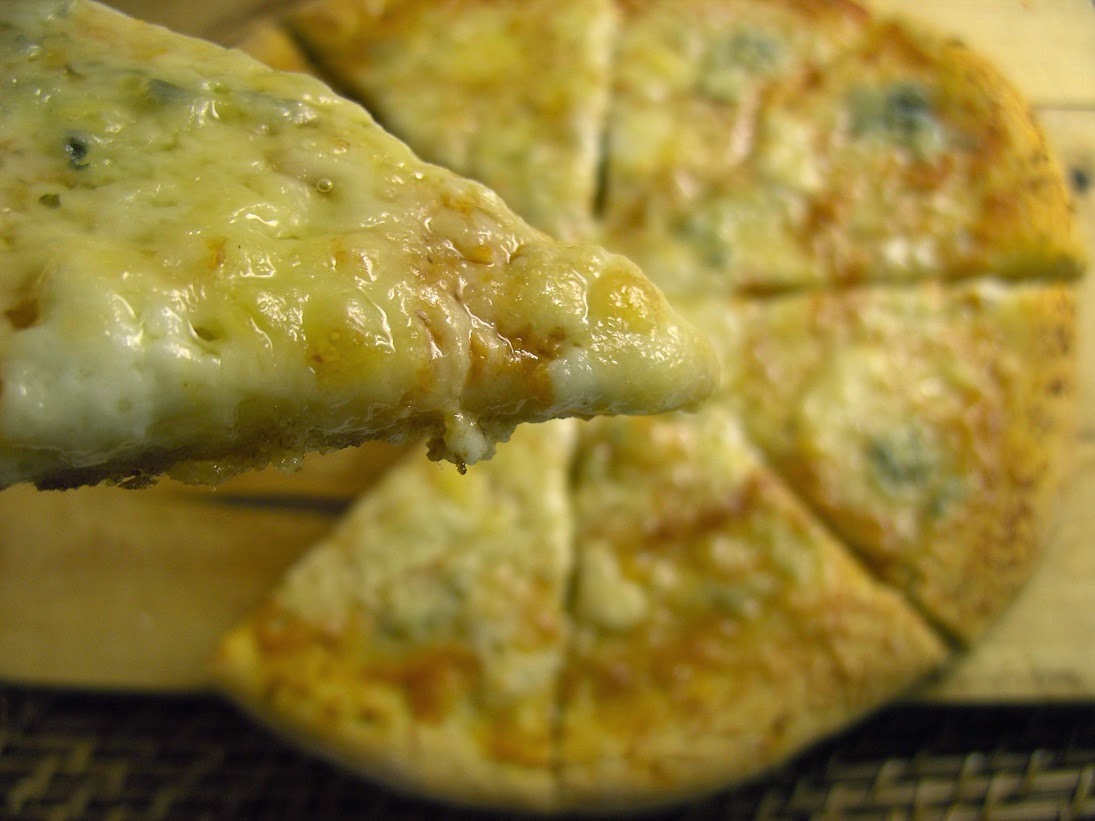
More? Sure, the four cheeses. I took buffalo mozzarella, gorgonzola, parmesan and a fourth very delicious Italian cheese, which unfortunately I (here it comes again) forgot the name of. The cheese was very creamy and in fact you get the most of that cheese when you eat it just the way it is. Yum!
Once you have all the components read, heat up the oven to 250 °C (unless you have a pizza oven). Roll out your dough and thinly spread on some of that tomato sauce. Then scatter as much of the cheese all over the pizza. Make sure to taste small bits of cheese to survive the time until the food is ready.
If you feel like it, you can finish off the pizza with a splash of olive oil. Since we are having an Italian week here, in fact, you can put a splash of olive oil to anything we are having.
My pizza was ready after 15 minutes ... well, I cut it into pieces ...


... and went for it ...


It was so yummy, I could have had more. Luckily, I already had frozen the remaining pizza dough. In time, that would be meal 4, but until then it is resting in piece.
So, if you love cheese, that's your pizza. At least it's mine. Even now while I am writing this done I am starting to salivate again. Or is this due to the fact I had some of meal 3 ...

Meal 3: Lasagne (do I have to say more)

Still I am doing Italian ... thanks to that lovely tomato sauce. I was so glad I still had that much left over.
Another pan goes onto the oven and again some olive oil is heated up.
I have 500 g of minced pork that needs some browning in the pan. Season with salt and pepper. Watch as the heat does it's job. Add the tomato sauce when the meat is ready. Stir through well and heat the sauce up.
Meanwhile you have a sufficiently large tin (mine was 35 cm x 25 cm) ready. Add some - I told you so - olive oil to the bottom of the tin. then lay out a layer of lasagne sheets.
Oh, we would need some kind of bechamel for the lasagne as well, I reckon. Nah, forget about it. We are doing a cheat version. Mix 200 g of crème fraîche with salt, pepper, a large hand full of grated parmesan and an egg.
Next onto the lasagne sheets goes a half of the minced pork tomato sauce, then half of the bechamel cheat, then some lasagne sheets again, followed by the remaining meat, followed by the remaining bechamel cheat. Well, how does that look?
Obviously something is missing. Ah, here we go, I topped the whole thing with 200 g of grated mozzarella cheese and ... you know.


30 - 35 minutes in the oven, which has been heated up to 200 °C, will do. The cheese will turn brownish.
Now you would only need to slice the lasagne up and serve it. Dig in! The lasagne was as delicious as the pizza. Dangerously delicious!


You might get some further ideas and serve a rocket and tomato salad on the side. However, I was satisfied with as it was. After all, I know about all those vegetables hidden in that meal.


When some lovely ingredients smile at you, smile back and get cooking.

Now, what about you, do you have any chain reactions going on in your kitchen? While I don't want to turn this into a blog challenge necessarily, why not share your Food Chain Reaction Stories with us by linking up a post in the comments and ... see what will happen.
Since I also made good use of the leftover tomato sauce, this is a fitting post for Elizabeth's from Elizabeth's Kitchen Diary No Waste Food Challenge, which ... what a coincidence ... is hosted by my own self this month.