Now that went well, did it? Rather not! Or did it? Anyway, a lot depends on your attitude. As to that I rather have a negative one, although I am trying my best to get rid of it. On that thought, as long as you are still alive and well, you should be happy and consider things to be well.
As to the global picture ... well, this isn't the place nor the time to expound this. After all, this blog isn't called "Problems Around the World", but rather "Cooking Around the World". For that, right here, right now, I am not available for talking about what is going on in this crazy world ... and I don't mean good crazy.
Talking about good crazy would bring us a bit closer to the style of this blog. You haven't read anything good crazy lately around here. Well, that's not my fault, is it?
That won't get us anywhere, looking for the guilty one, who's fault it is. Rather we want to look ahead and concentrate on getting out something positive.
On that note, let me ask about your opinion regarding butter. Do you like it? How would you care for extensive use of it in a cake and then ... call it gooey butter cake?
I don't know about you, but for my ears this has a quite positive ring to it
Now it seems that the US city of St. Louis, Missouri, seems to be a bit famous for its gooey butter cake. Well, there is only one way to find out about it. Does this already sound like bullwhip and fedora hat again to you?
So come along as we not only cook (or rather bake) around the world, but as we actually travel around the world ...
Showing posts with label butter. Show all posts
Sunday, 20 October 2019
Thursday, 15 June 2017
Strawberry Time - Strawberry, Mascarpone & Chocolate Cake
Some say it is best to eat foods that are in season. I especially enjoy this with regards to strawberries. They taste so much better, when they are fresh from the region compared to the ones you get at the supermarket and are imported from who knows where. Last year we didn't take full advantage of that, but this year will make up for it. Nearby is a large field of strawberries where you can pick them for yourselves at a very good price. Therefore whenever we feel like it we head over and get some fresh strawberries. Well, that is when we have finished off the last once we got. Usually the last remaining once end up in a smoothie or something like that.
There are many ways to enjoy the strawberries. You can eat them fresh, with yoghurt, with your muesli, with curd cheese, in smoothies, in cakes, in salads ... well, we just watched Forrest Gump the other day, but I think I really shouldn't go into this part in detail of what you can do with strawberries like they did in the movie with shrimps ... hm ... eh ... well ... eh ... and that's about all you can do with strawberries. Well, I haven't got that much time and I really can't imagine an end of that list.
Therefore I will rather limit my writings to what I did and what I announced in the title of this blog post: Strawberry, Mascarpone & Chocolate Cake.
I tried to think of another name for this cake, but I really couldn't come up with any and above that in these days there are certain words you rather shouldn't use in public. Anyway, let's focus on the more important things ...
Picking strawberries is really enjoyable for me, in the sun, it's relaxing after a full day at the office. I reckon we still have a few weeks, maybe about two and then it will already be over with this field. I guess, though, it is not our fault.
We usually get about two kilos or a wee bit more of strawberries. After all we can easily return and get some more another day.
There are many ways to enjoy the strawberries. You can eat them fresh, with yoghurt, with your muesli, with curd cheese, in smoothies, in cakes, in salads ... well, we just watched Forrest Gump the other day, but I think I really shouldn't go into this part in detail of what you can do with strawberries like they did in the movie with shrimps ... hm ... eh ... well ... eh ... and that's about all you can do with strawberries. Well, I haven't got that much time and I really can't imagine an end of that list.
Therefore I will rather limit my writings to what I did and what I announced in the title of this blog post: Strawberry, Mascarpone & Chocolate Cake.
We usually get about two kilos or a wee bit more of strawberries. After all we can easily return and get some more another day.
After we have gotten one of the key ingredients for our Strawberry, Mascarpone & Chocolate Cake, I reckon it is about time to start with the preparation ...
Labels:
butter,
chocolate,
curd cheese,
lemon,
mascarpone,
strawberries,
sugar,
vanilla
Thursday, 4 May 2017
Millenium Falcon Salted Caramel Cake
May the fourth be with you!
Again another year has rolled passed. While I don’t care much about any kind of holiday and special cooking and baking for it, I like May the 4th – Star Wars Day, well I like the pun on the phrase “May the force be with you!” Fine, I liked the movies, too.
But that’s it. Ah, well, when I have the chance I bake something … and I reckon, I will go to the cinema to watch episode VIII in December.
However, I am not going to send a model of a spacecraft into space in order to get some attention. Hm …!?! Maybe I could sent a cake of a spacecraft into space …
Anyway, during the weekend I was talking to a friend and he suggested I could maybe make a Death Star cake. Nah, that would be too much work. What about some cupcakes. We arranged some batter and added green food colouring. After baking, the idea was to add some marzipan to make them look like Yoda heads. Well, the cupcakes didn’t turn out that green and the homemade marzipan not that good for modelling, although it tasted very yummy due to the addition of Amaretto.
Then I got an idea for May the 4th …
A rough sketch of the Millennium Falcon from Star Wars that would help me the next day to build a Millennium Falcon cake.
We would need a sponge and some sort of filling or topping. I did some more pondering and researching …
I wanted something with caramel and cream cheese. A quick look at the basics again for achieving it and we are off to shopping. Maybe a marzipan cover would be lovely.
Shopping ready! Now, let’s go for it …
Ingredients:
Sponge:
225 g butter
225 g sugar
4 eggs
225 g (self-rising) flour
1 tsp baking powder
Vanilla extract
Pinch of salt
Salted Caramel Sauce:
200 g brown sugar
85 g butter
120 ml cream
Vanilla extract
1 tsp fleur de sel (or sea salt)
Buttercream:
225 g butter
115 g cream cheese
Vanilla extract
The salted caramel sauce
400 g icing sugar
Method:
Don’t worry, the sponge is just a standard sponge as you might use for a Victoria Sponge cake as well. So, if you don’t feel like Star Wars, have a normal round one, but …
We feel like Star Wars now. After all, John Williams is assisting us through the whole process. So turn up the volume of your speakers. Yes, it would be best this post comes with a soundtrack,but if you want to hear anything, you have to put on the music yourself.
Fine, “Bake we must!”
Take a bowl, add the butter and the sugar for the sponge and get whisking … until it’s fluffy.
Yeah, I don’t know whether that is fluffy, but that’s the way I’m gonna use it. Crack one egg into it. Beat it. Crack another egg. Beat it again. Next egg. More beating. Last egg. Finish beating. Add the vanilla extract.
Now sift in the flour and the baking powder. Don’t forget a pinch of salt. Incorporate everything to get a smooth batter.
For the baking the oven is heated up to 180 °C.
Line a baking tray with baking parchment and spread the batter on it …
Like this it goes into the oven for 25 minutes.
At this point you could be tempted to start the salted caramel sauce. Don’t do it! see where you can tidy up things while the sponge is baking.
Remove the sponge from the oven and give it time to cool down.
Now you can feel free to start the salted caramel sauce. Get yourself a saucepan and add the brown sugar and cover it all with water. Place the remaining ingredients for the sauce nearby …
Put on the heat … full power … energise!
The sauce seems a bit tricky. Obviously, you can’t see when the sugar starts to get an amber colour, for it already has such. Hear it is, where you need to use the force, you need to feel it. Well, you don’t have to close your eyes for the next step, but if you want it, go for it.
Reach out with your senses and feel the caramel getting ready as the liquid is bubbling away. You will sense a change in the bubbling or a tremor in the force …
When that happens, reduce the heat from full to medium, get a wooden spoon into your right hand … eh … or left hand, if you prefer that. Start stirring.
Throw in the butter. Stir and watch it melt away.
Pour in the cream and watch it distribute, stirring all the time.
Add the vanilla extract and the fleur de sell (sea salt), while you continue stirring.
At this point, I turned off the heat and continued stirring with the remaining heat until the caramel sauce stopped bubbling. Then set it aside for cooling.
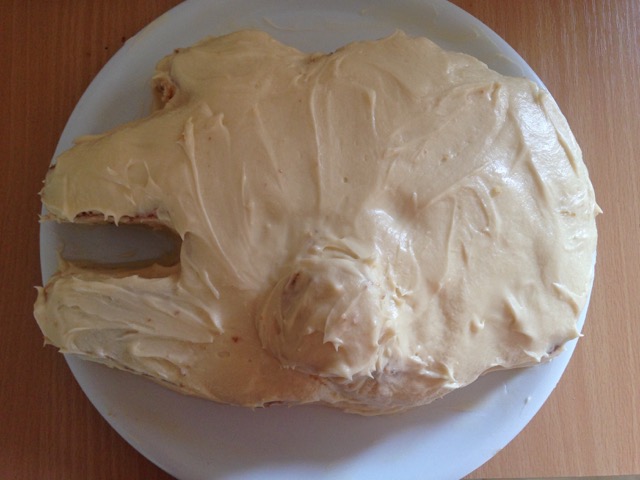
Back to the sponge. I cut it into half and placed one piece above the other to follow my Millennium Falcon blueprint to cut it out of the sponge.
Hm … it looked … okay …
That will do. In order to be able to proceed here, we need the buttercream ready.
Another bowl, some more whisking and we are ready …
Add the butter and the cream cheese to the bowl and whisk it together. There goes another bit of vanilla extract.
The salted caramel sauce isn’t that hot anymore, so we can spoon it into the bowl as well and mix it in thoroughly.
Bit by bit we add the 400 g icing sugar. That sounds like awful a lot. No worries! Combine it all well. Ah, that looks like awful a lot of buttercream. Fine, we are going to use it all up anyway.
Spread a layer of … let’s say one third of it … on the bottom sponge …
Carefully place the top sponge … eh … on top of it. No big deal, huh?
Use some of the sponge cuttings to create a satellite dish, a round object placed on a wedge.
It’s time to use up that remaining buttercream and cover the whole cake in it. Give it your best to get the cream on. If you have any cream in undesired places, I’m afraid you have to remove it and eat it up. Well, that’s what I did.
Hm, you get an idea of the Millennium Falcon at this point, but we still can do better with some chocolate buttons and a bit chocolate from a decorating pen …
That’s it. In order for my cake decorating skills to improve, I reckon I have to do a few more cakes. Well … if I get any ideas, that is.
When I was younger … much younger … I never had a Millennium Falcon model, but now I have a Millennium Falcon cake and … the only thing can do with it, is eat it up. However, considering the over 500 g of sugar and the amount of sugar in it, I guess, I have to enlist the help of others to deal with the cake. Otherwise I’ll have a BIG problem.
So, if you are i the neighbourhood anytime soon …
Well, I had a model of a TIE-fighter once. I already thought of making some TIE-fighters with cookies and marzipan or even a marzipan X-Wing, but … that would have been a lot harder.
Speaking of marzipan, there was no room for a marzipan cover here, so I definitely have to make some more cake involving that soon.
For the time being, though, I wish you a lovely day and … if you feel like it … share some of your Star Wars Day creations in below in the comment section.
Otherwise, have a delicious Salted Caramel cake …
- nicht mit Facebook verbunden
Labels:
baking powder,
butter,
cake,
cream,
cream cheese,
egg,
flour,
Star Wars,
sugar,
vanilla
Friday, 28 April 2017
Spinach and Feta Tart
I am really feeling great. Life is beautiful, and so is my lovely wife. Surely I am feeling wonderful and in part it is also because I stick to the three pillars of healthy living: regular exercise, health diet and sufficient sleep.
Sometimes we tend not to belief in simple advice, but … usually there is only one way to find out: try it!
Accordingly, in order to find out, whether you like my dish for today, you simply have to try it: Spinach and Feta Tart.
Well, there was some kind of pondering going on in my head, whether I should call it Spinach and Feta Tart or Feta and Spinach Tart. Looking at the ingredients, there would have been other options, too, like Spinach, Feta and Pine-nut Tart. Continuing from that one, yet more options would have been possible: Feta, Spinach and Pine-nut Tart or Pine-nut, Spinach and Feta Tart or Pine-nut, Feta and Spinach Tart. Then there is the option of abbreviating things: SF-Tart, FS-Tart, FSP-Tart, PSF-Tart, PFS-Tart, SFP-Tart or SPF-Tart … and we haven’t even mentioned there is garlic involved as well, nor is there any hint towards the kind of pastry used.
Nothing of that doesn’t really matter, so we stick with Spinach and Feta Tart. After all those are the main heroes. Here we go with the recipe …
Ingredients:
400 g puff pastry
Knob of butter
1 onion
2 cloves of garlic
500 g spinach
1 tsp. nutmeg
200 ml cream
200 g feta
80 g pine-nuts
2 eggs
Salt and pepper
400 g puff pastry
Knob of butter
1 onion
2 cloves of garlic
500 g spinach
1 tsp. nutmeg
200 ml cream
200 g feta
80 g pine-nuts
2 eggs
Salt and pepper
Method:Lightly oil your tart tin. I just rub it all over with butter, fine only the inside of course. Then line it with the puff pastry. It could look somewhat like this …
In a large pan, melt the knob of butter and then add the finely chopped onion and garlic. Fry them until translucent. Get your fresh spinach ready and wilt it down in the pan, even bit by bit when your pan can’t hold it at the same time. Season with nutmeg.
Get yourself a large bowl and mix the crumbled feta, cream, pine-nuts and the two eggs. Once the spinach is ready, incorporate the contents of the pan in the bowl as well. Season with salt and pepper.
All that goes now onto the puff pastry and then into the pre-heated oven at 180 °C for about 30 minutes. Honestly, I always try every dishes at 180 °C for 30 minutes. That’s my favourite baking temperature and time. In between I check, though, if it’s necessary to reduce or extend the time. Once the Spinach and Feta Tart got some nice colour to it, I reckon, we are ready to remove it from the oven.
It already has been a while since I did it and I nearly lost the recipe since I forgot to take notes, but since I have been rejuvenated recently, it worked well with my brain.
At this point, you just need to slice up the tart, serve it and enjoy it.
That should be possible. I don’t know what you think, but the combination of spinach and feta somehow sounds Greek to me. Just a feeling. If you like to give it a more Greek touch, you should use a few sheets of filo pastry instead of just normal puff pastry. Optionally you could also drink an Ouzo or two while preparing it. It’s entirely up to you, though.
Anyway, dig in …
See you another time then. I only need to watch now, how this rejuvenation thing is working out, how far it will take me back and, whether, it will result even in doing some stupid things …
Sunday, 23 April 2017
Panko Fried Brie with Lavender Mushrooms
While the weather is not as it’s best these days, we already had some quite pleasant days.
It’s best not to expect perfection all the time, because you are only going to be disappointed. For sure, you don’t want that. Rather concentrate on the small things of beauty always around you, appreciate that.
Then you can find enjoyment more often …
… like in a quick and simple meal with not much fuss about it. Among the simple things I enjoy is cheese. I wouldn’t want to imagine a life without cheese. If I would have to choose between cheese and meat – which one to go without, I would select the meat to go without rather than the cheese.
But, I don’t have to choose. However, for the following meal I have chosen to go without meat and with cheese … with Brie to be more precise. So we are having Panko Fried Brie with Lavender Mushrooms …
Somehow I like lavender, so I try to look for new ways to carefully introduce it into cooking. See, whether it works today.
Ingredients:
Olive oil
200 g mushrooms
2 cloves of garlic
Salt, chilli
Juice of half a lemon
1 tsp. lavender buds
Knob of butter
1 Brie (200 g)
1 egg
Panko (or other breadcrumbs)
Rosemary
Olive oil
200 g mushrooms
2 cloves of garlic
Salt, chilli
Juice of half a lemon
1 tsp. lavender buds
Knob of butter
1 Brie (200 g)
1 egg
Panko (or other breadcrumbs)
Rosemary
Method:
Use two pans to get both elements ready at the same time. I used a griddle pan for the Brie.
Well then, how do we go about?
Heat up some olive oil for the mushrooms.
Prepare the brie by tossing it around in the whisked up egg. Next you have the panko ready together with some salt and finely chopped rosemary. Try as best as you can to coat the Brie with it.
The mushrooms start rolling in the pan. Season them with salt and a bit of chilli if you like.
The Brie is in the other pan. You turn it, when you think the time is right after a few minutes. If it starts oozing away in your pan, you’ve lost and evidently waited too long.
Add the lemon juice and the lavender to the mushrooms and let them continue in the heat. Finish it off with a knob of butter.
When you have done everything right, both the Brie and the mushrooms are finished at about the same time. So, serve it up …
Have some bread on the side and … whatever makes you happy. Fine, here we have another use of lavender in cooking. As I felt, the taste was good and I enjoyed it.
Do you enjoy going for a walk. I hope to walk … eh … well, a lot this year.
Anyway, have a lovely day! Keep smiling!
Sunday, 16 April 2017
#Foodfitness with Beef and Cheese Empanadillas
It is about time I start putting up some more food here on our blog. It has been quite a while of inactivity, which doesn't mean I haven't been active. In fact I have been very active and I have been doing quite some exercise, enjoying it together with my beautiful wife. Life is really good!
Now, though, it is time again for some other kind of exercise again ... food fitness.
Let's have some Spanish food today, which you could also use for a picnic, if the weather so permits.
Ingredients:
450 g flour
1 tsp. baking powder
1 tbsp. butter
1 egg
1 tsp. honey
pinch of salt
lukewarm water
1 onion (finely chopped)
some chillies (to your liking, finely chopped)
2 cloves of garlic (finely chopped)
500 g minced beef
smoked paprika
salt, pepper
2 tbsp. tomato puree
basil, rosemary, mint
3 spring onions (chopped in rings)
150 g grated cheese (whatever kind you fancy)
30 g sultanas
oil for frying
Method:
First of all we go for the dough, setting the tone for the whole thing, putting some energy in the preparation, for there will be much energy in the consumption as well, although I am not quite sure whether you want to hear it.
Put the flour with the baking powder in a bowl, rub in the butter. Then add the salt, honey and egg. Knead the dough in a fitness-like fashion adding as much of lukewarm water as it needs to bring the whole dough together.
Then let the dough rest for at least 30 minutes. In case you also need that rest, I guess you have to give it some more time. Otherwise you can you the time wisely to already prepare the filling.
You start off with the onions in a large pan, let the chillies and the garlic join. After the onions are translucent you can put in the meat and season it with salt, pepper and the smoked paprika. Once the meat has gained sufficient colour you can add the tomato puree and go on frying as long until it is all relatively dry. We don't want the filling too wet to cause any problems.
Just when it is all ready that far, turn off the heat and add the basil, rosemary, mint, spring onions, cheese and sultanas. It might look a little bit like this ...
You have some time for it to cool off a bit. That will be the time to prepare the individual empanadillas and have some extra exercise. If you still feel you need more exercise, do some push-ups, squats or crunches later on, but here we go with good old food fitness ...
Try to make it thin. This way you will enjoy the filling much later when all is finished. Give it your all. You want to feel those muscles in yours so you can actually say you have done some real exercise. Get some round shapes out of the dough for the final empanadillas. We got a special tool for it here so it will work out perfectly with the shape and sticking in the filling.
Give every circle of dough, we had 15 in the end, a teaspoon of filling or a little bit more, as your conscience permits and as you will be able to seal them properly afterwards. We don't want any filling to exit while frying. We only want to let the filling exit in your mouth while eating.
If it looks like this you might be doing it right. To ensure they are securely shut, you can use a fork to seal them well.
Then enjoy the time for frying the empanadillas in sufficient oil and hopefully they are securely shut. I didn't do it so well, when I tried it the other week, but this batch went perfectly well without incidents ... for my wife was helping to make it happen just fine.
Now the only thing that remains is enjoy your empanadillas with some salad and a beer ... any kind of beer. It doesn't need to be Spanish, although I wouldn't mind a bottle of Estrella de Galicia.
We hope you had enough exercise preparing the empanadillas. As for my part I feel like I still have to do some more exercise. These days I am kind of crazy about doing some exercise. That's not bad, after all the body feels a lot better when it is filled with muscles and not with ... anyway, I don't want to suggest anything here, but just that I am always going to enjoy some good food exercise, when it also leads to some tasty results. It would really make me feel bad, if I would put in all the effort in preparing and eating if it wouldn't be worth it.
In this very case here of the empanadillas we can assure you that it was absolutely worth it and we are going to enjoy it any time.
We hope you are having a good time and are keeping healthy!
Labels:
baking powder,
basil,
beef,
butter,
chilli,
egg,
flour,
garlic,
honey,
mint,
onion,
rosemary,
smoked paprika,
Spain,
spring onions,
tomato
Wednesday, 12 April 2017
Paprika Beer and Beef Goulash
What are we doing today?
The same we do every day – we take over the world!!!
Really? Would it be worth it? Nah, it's better to be satisfied with what you have. It's more worth ging for something else ...
For today, I have selected this …
That would be some kind of beef goulash with paprika and beer or … hm … eh … well, let’s call it Paprika Beer and Beef Goulash.
Let’s do it then, if I still get it right …
Ingredients:
A knob of butter
500 g beef, cubed
1 large onion, chopped
3 cloves of garlic, chopped
1 red bell pepper, cut
1 red chilli, chopped
300 ml lager
500 ml beef stock
Salt, pepper, smoked pepper
A knob of butter
500 g beef, cubed
1 large onion, chopped
3 cloves of garlic, chopped
1 red bell pepper, cut
1 red chilli, chopped
300 ml lager
500 ml beef stock
Salt, pepper, smoked pepper
Method:
So, what are we going to do first? I suppose it goes somewhat like this …
Melt the butter in a large pan at medium heat. Then seal of the beef in the pan. Once you have done that, briefly remove the beef from the pan. I’ll tell you, when it goes back.
Then chuck in the onion and let them go until translucent. Toss in the garlic, the bell pepper and the chilli.
What’s next? Yes … eh … hm, why not add the beef back to the pan and season with salt, pepper and smoked paprika.
Now we are almost there … well, it will need some time, but there are not many steps left. Therefore pour in the beer and the beef stock. Bring to the boil and let simmer for … until the beef is tender.
Yes, go for it. Right, it will still take a while, but, no worries.
Meanwhile you could think about what you want to have together with it. Maybe some lovely bread and an even lovelier salad. It’s just a suggestion.
Whatever the case … I think … I enjoyed it.
What else am I going to do with this post?
I have no idea ... although there would be tons of options, which on the other hand make thinks complicated again, but I think I could have something to eat. That always makes sense, doesn't it?
Paprika-, Bier- und Rindergulasch
Zutaten
In kleines Stück Butter
500 g Rindfleisch, gewürfelt
1 große Zwiebel, gehackt
3 Knoblauchzehen, gehackt
1 rote Paprikaschote, klein geschnitten
1 rote Chilli, gehackt
300 ml Bier
500 ml Rinderbrühe
Salz, Pfeffer und geräucherter Paprika
In kleines Stück Butter
500 g Rindfleisch, gewürfelt
1 große Zwiebel, gehackt
3 Knoblauchzehen, gehackt
1 rote Paprikaschote, klein geschnitten
1 rote Chilli, gehackt
300 ml Bier
500 ml Rinderbrühe
Salz, Pfeffer und geräucherter Paprika
Zubereitung
So, was machen wir als erstes? Gut, ich denke, es läuft folgendermaßen …
Die Butter bei mittlerer Hitze in einer großen Pfanne zerlassen. Dann die Rindfleischstücke rein und von allen Seiten anbraten. Wenn das erledigt ist, das Fleisch kurz aus der Pfanne entfernen. Ich sag dann bescheid, wenn es wieder rein kann.
Nun die Zwiebel reinwerfen und sie glasig dünsten. Den Knoblauch, die geschnittene Paprika und die Chilli dazugeben.
Wie geht’s weiter? Ja … äh … nun, warum nicht das Fleisch zurück in die Pfanne geben und das ganze mit Salz, Pfeffer und Paprika würzen.
Jett sind wir schon fast fertig … nun, es wird zwar noch eine Weile dauern, aber es sind nicht mehr viele Arbeitsschritte übrig. Daher nun das Bier und die Rinderbrühe angießen, alles zum Kochen bringen und köcheln lassen … bis das Rindfleisch schön zart ist.
Dann irgendwann ist es Zeit zum Essen und man könnte es so servieren, wie auf den Bildern oben gezeigt … oder man hat noch eine andere tolle Idee.
Mahlzeit!
Monday, 3 April 2017
Meat Pie from Scotland - Bridie
Time is always rushing by so fast and ... well ... often I don't know where it went. There is not much you can do about it, but it's better, if you don't feel like your life is just passing by and you are just in a routine and are not trying out new things. Well, this time you might try something from Scotland … Bridie …
Already before I thought about trying it and so I had to do some research and here we go with my results.
Ingredients:
300 g flour
75 g butter
75 g lard
Salt and pepper
A bit of water
500 g minced mead
1 onion, finely chopped
2 cloves of garlic, finely chopped
300 g flour
75 g butter
75 g lard
Salt and pepper
A bit of water
500 g minced mead
1 onion, finely chopped
2 cloves of garlic, finely chopped
Method:
First of all we start with the pastry. The flour goes into a bowl with a pinch of salt. Oops, I added pepper here, too. Ah, no worries. Then add the butter and lard. Rub it into the flour. Then add just enough water to bring the pastry together into a nice lump of dough.
Wrap the dough into cling film and put it into the fridge for one hour.
Divide the dough into four portions and roll each one out into a kind of rectangular shape.
Mix the minced meat with the chopped onion and garlic and generously season with pepper and a bit of salt. Accordingly divide the meat mixture between the four dough pieces.
Wet the edges of the pastry with water and fold over the loose end and carefully seal it. Move the two ends of the closed pastry together so that the crimped edge is on the outside. Hm, does this make sense? Have a look …
Make incisions on top of the bridies. Transfer the unbaked bridies to the fridge for half an hour. When it’s almost time, pre-heat the oven to 200 °C. Bake the bridies for 30 to 40 minutes until they have a lovely colour. Luckily, I noticed the auto-correction or otherwise we would have had baked brides. For sure something, we don’t like to have.
Ready for eating. Either eat them just like they are as a snack or with potatoes and vegetables on the side.
Some kind of gravy would be nice for they can be a bit dry. Well, at least I had a glass of cider on the side and a glass of whisky afterwards …
Bridie
So, die Zeit ist abgelaufen. Erst mal komme ich wohl nicht nach Schottland. Aber wenigstens kann ich ein wenig traditionelles schottisches Essen ausprobieren. Hm, Haggis erst mal nicht. Eher diese gefüllten Teigtaschen, die man Bridie nennt. Für solche Sachen bin ich ja immer zu haben.
Zutaten:
300 g Mehl
75 g Butter
75 g Schweineschmalz
Salz und Pfeffer
Etwas Wasser
500g Hackfleisch
1 Zwiebel, feingehackt
2 Knoblauchzehen, feingehackt
300 g Mehl
75 g Butter
75 g Schweineschmalz
Salz und Pfeffer
Etwas Wasser
500g Hackfleisch
1 Zwiebel, feingehackt
2 Knoblauchzehen, feingehackt
Zubereitung:
Erst mal zum Teig. Das Mehl in eine Schüssel geben. Dazu kommt eine Prise Salz … oops irgendwie hab ich auch eine Prise Pfeffer dazugegeben. Was soll’s. Nun noch die Butter und den Schweineschmalz dazu. Das dann sorgfältig ins Mehl massieren. Zum Schluss noch Wasser dazu, so dass wir einen schönen Teigklumpen erhalten. Dieser wandert dann für eine Stunde in den Kühlschrank – eingewickelt in Frischhaltefolie.
Währenddessen könnte man schon mal die Füllung vorbereiten. Keine grosse Sache. Einfach das Fleisch mit der Zwiebel und dem Knoblauch vermengen, salzen und pfeffern und fertig isset.
So, Teig zur Hand, in vier Teile aufteilen und ausrollen, in so ne Art Rechtecke. Die Fleischmasse auf die vier Teigteile verteilen (siehe Foto oben). Die Ränder des Teiges mit Wasser anfeuchten und zusammenklappen, kleben. Wie oben auf dem Foto gezeigt, die Spitzen der Teigtaschen nach innen zusammenschieben und oben am Teig zwei Einschnitte machen. Das ganze geht dann nochmal für eine halbe Stunde in den Kühlschrank bevor die Bridies bei 200 °C 30-40 Minuten gebacken werden.
Das fertige Produkt so als Snack essen oder mit Kartoffeln und Gemüse zusammen, vielleicht noch ne Sauce dazu oder vielleicht auch nen Spritzer Ketchup.
Die Bridies schmecken auch kalt am nächsten Tag oder auch wieder kurz aufgewärmt.
Friday, 4 July 2014
Chanterelle, Medallions of Pork and Fried Potatoes
What do you do, when you have cooked to many potatoes and as a consequence have leftovers? For my father this was never a question. The only possible answer was fried potatoes. Therefore this was one of the regulars.
Anyway, I don't know, whether I should still be doing this, but after all, this is the game, Bloggers Around the World. So I keep on going ... or keep on cooking adding more work for myself later on for doing the mammoth round-up. I got some chanterelle mushrooms and some medallions of pork, so I had to go for this one.
There is really no big deal to it, but quite some butter. The Medallions of pork go to the pan in some butter and are seasoned with salt and pepper.
The chanter ell mushrooms go to the pan in some butter and are seasoned with salt and pepper. Fine I added a chopped up onion as well.
You know, the potatoes are cooked and then ... yes, guess ... fried in some butter and seasoned with salt, if you still wish.
Now, this all is somehow not with much variation of colour, but for that you can add a salad on the side. If you do it all right, you can enjoy a lovely meal, that is, if you like those ingredients.
Well, those goes for Germany today, although I would have preferred some baguette, cheese and red wine.

Sunday, 4 May 2014
Beware of the Dark Side ... Raspberry Chocolate Tart
"Is the dark side stronger?" "No! No ... no. Quicker. Easier. More seductive."
A long long time ago in a kitchen far far away ...
In fact, it wasn't so long ago and not far far away. Well, the kitchen might be just around the corner, but still ... you have to beware of the dark side, for it is very seductive ... eh ... this raspberry chocolate cake is very seductive and if you don't beware and have more pieces of it than you reasonably should, you can imagine what can happen.
Well, I show you anyway ...
This Raspberry chocolate tart is based on a recipe from Jamie Oliver's Cook with Jamie.
Ingredients:
For the pastry:
150 g butter
100 g sugar
A pinch of salt
250 g flour
1 egg
30 g cocoa powder
For the filling:
100 ml full fat milk
400 ml cream
250 g dark chocolate
2 eggs
... and raspberries
Method:
First of all, we go for the pastry, naturally, for it has to rest in the fridge for at least an hour. So, cream together the butter and the sugar. Then add the pinch of salt, flour, egg and cocoa powder. Carefully bring all the ingredients together to form the dough.
After the hour, get the pastry into a greased loose-bottomed tart tin (you knew that would be coming one day again). Blind bake the pastry for 12 minutes at 180 ºC.
Now you can already prepare the filling. Add the milk, cream and sugar to a suitable sized pot and carefully bring to the boil. Stir once in a while. Then take the pot from the heat and add the chocolate. Stir it until the chocolate has melted away and you have a smooth mixture. Then whisk in the eggs one by one.
Pour the filling onto the blind baked pastry case and get it back into the oven at 170 ºC for 15 minutes. After that leave the raspberry chocolate tart some time to cool. Wait? Why raspberry chocolate tart? Fine, after a while, place the raspberries on top of the tart, pushing them into the chocolate filling. Use as many raspberries as you wish. Are you satisfied now?
When you go for it, you can even add a dollop of whipped cream, crème fraîche or vanilla ice cream., but ... beware of the dark side ... and May the 4th be with you ...
Now I have added this post also to Bake of the Week at Casa Costello.
While we still have time for thing, it's good as well to add this to May's Calendar Cakes, which is being hosted by Rachel at Dolly Bakes.

Labels:
butter,
chocolate,
cocoa powder,
Cook with Jamie,
cream,
egg,
flour,
Jamie Oliver,
milk,
raspberry,
Star Wars,
sugar
Subscribe to:
Posts (Atom)